You can request a new Team using the Request a Team app.
A Team is automatically created after you submit the request, but it can take a couple of hours for all features to become available.
The following institutions should not use the Request a Team app as these Colleges have their own Microsoft tenancies and members should first seek approval from their local IT staff:
- Members of Christ's College
- Members of Trinity College
- Members of Fitzwilliam College
Once approval has been gained, please email the UIS Service Desk to request a Team, including the proof of approval from your College.
How to use the Request a Team app
On loading the app you have 2 choices for how to create your Team:
- From scratch: this builds a Team site based on Microsoft's Standard Template for a Team site
- Use Template: this builds a Team site based on one of three Microsoft templates available for Education:
- Staff Team
- Professional Learning Community (PLC) Team
- Classroom Team
Find out about the differences between templates on the Microsoft support website .
You can return to the app at any time to check the progress of your application. Select the My Requests tab to see the status of your request, for example, Submitted or Team Created. When your Team request has been created and your site deployed, you will receive an email confirmation that it is now ready for use.
Creating a Team from scratch
-
Privacy settings
Once you have clicked the 'Build new' option under 'From scratch', you will be asked to choose the Privacy settings of your new Team:
- Private: restricted to either named individuals or groups
- Public: everyone in the University's Teams tenancy can join
Choose an option then select the 'Next' button.
-
Team Information
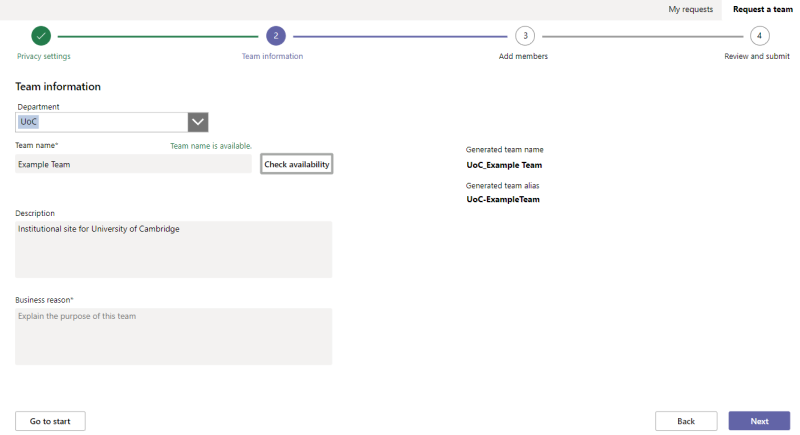
Search for your department and or institution in the 'Department' field and select your institutional code from the list. You can use one of the following prefixes if a department or institution is not appropriate:
- UOC: to be used for University wide Team site creation
- USER: generic prefix to be used when either an institutional or UoC prefix does not meet the required categorisation of the Team site
Enter a name for your new Team site in the 'Team Name' field and select the 'Check availability' button. If the name is available, you will see a confirmation message in green text.
Enter a brief description of the site in the 'Description' field to help people know what the site is about.
Briefly describe why you want the site in the 'Business Reason' field.
Select the 'Next' button.
-
Add Members
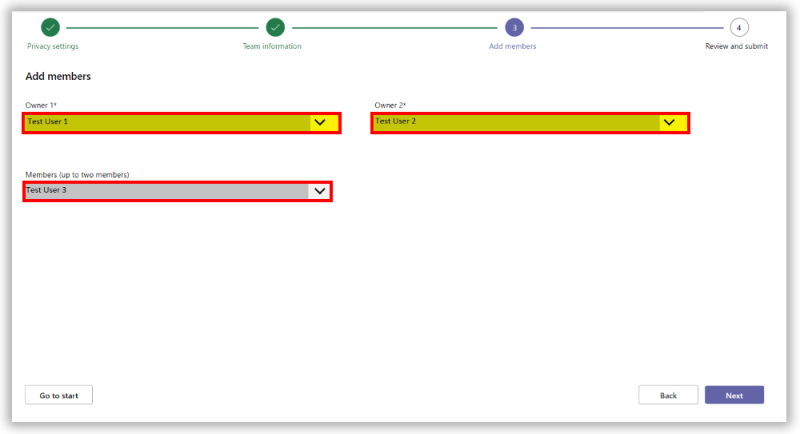
In the 'Owner 1' and 'Owner 2' fields, enter the CRSids of the 2 people you want to be your site's Owners (they will get additional administration permissions).
You can also add up to 2 members using their CRSids at this step but this is optional and members can be added to the Team once created.
Note that you cannot add Guest accounts as either Owner or Member, they must be added once the Team is created.Once 2 Owners have been added select the 'Next' button.
-
Review and submit
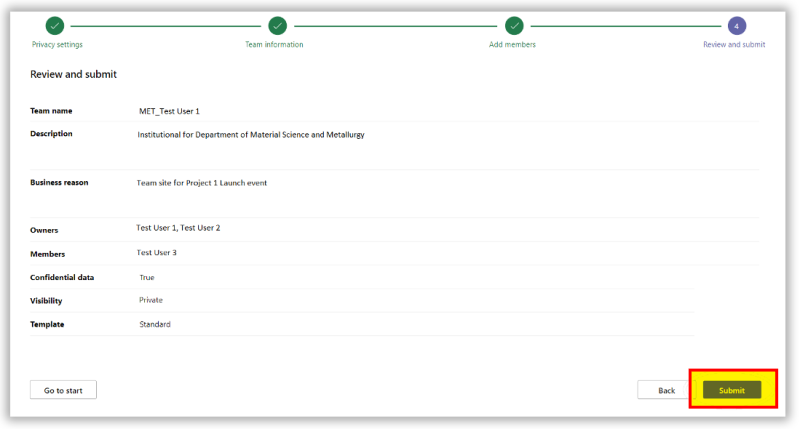
A summary of the options chosen will be presented, check the details of the Team request then select 'Submit' to complete the process or 'Back' to amend any details in the previous steps.
Creating a Team from a template
-
Select a template
Once you have selected the 'Create' option under 'Use template', you will be asked to choose the template for your new Team. See the 'About this template' section for information on how OneNote will be integrated into the Team site to make sure you are selecting an appropriate template for your Team's needs.
-
Privacy settings
Choose an option then select the 'Next' button.
- Private: restricted to either named individuals or groups
- Public: everyone in the University's Teams tenancy can join
-
Team Information
Search for your department and or institution in the 'Department' field and select your institutional code from the list. You can use one of the following prefixes if a department or institution is not appropriate:
- UOC: to be used for University wide Team site creation
- USER: generic prefix to be used when either an institutional or UoC prefix does not meet the required categorisation of the Team site
Enter a name for your new Team site in the 'Team Name' field and select the 'Check availability' button. If the name is available, you will see a confirmation message in green text.
Enter a brief description of the site in the 'Description' field to help people know what the site is about.
Briefly describe why you want the site in the 'Business Reason' field.
Select the 'Next' button.
-
Add Members
In the 'Owner 1' and 'Owner 2' fields, enter the CRSids of the 2 people you want to be your site's Owners (they will get additional administration permissions).
You can also add up to 2 members using their CRSids at this step but this is optional and members can be added to the Team once created
Note that you cannot add Guest accounts as either Owner or Member, they must be added once the Team is created..Once 2 Owners have been added select the 'Next' button.
-
Review and submit
A summary of the options chosen will be presented, check the details of the Team request then select 'Submit' to complete the process or 'Back' to amend any details in the previous steps.
Get help
If you have any queries, please contact the Service Desk.


