This page covers:
- adding and removing members in a team site - for sharing documents and files with small groups of people
- setting up permissions in a communication site - for intranets and internal websites
We also recommend that you read our page about how to monitor your SharePoint permissions. This gives some suggestions about how to make sure you are only sharing files with people you have
Adding and removing members in a team site
If you're using a SharePoint site connected to a Team, you can add and remove members from the Team. This will update who has access to the associated SharePoint site.
To quickly add and manage members, select the member's icon at the top right of the SharePoint site.
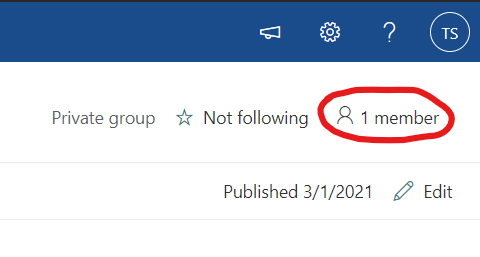
This brings up the 'Group membership' panel, where new members can be added, and current members can be seen and their access edited or removed.
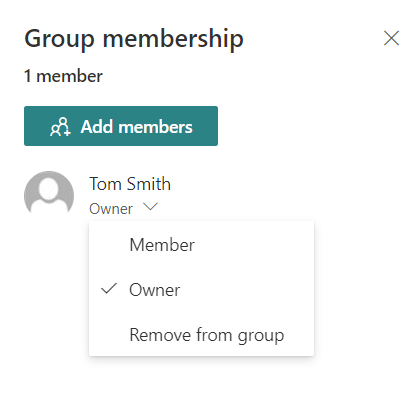
Most SharePoint site management can be done here. You can add or remove people, or promote them to 'Owner' or demote them to 'Member' as required.
Setting up permissions for communication sites
Understanding user groups in communication sites
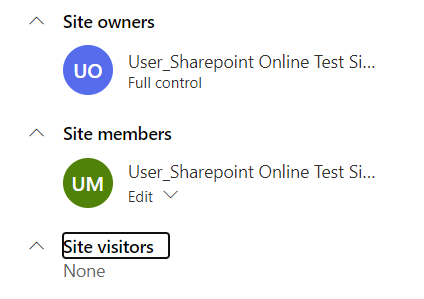
SharePoint Online has 3 main default sharing groups:
Site owners
Site owners have 'Full control' over the site and are responsible for its administration and access. It's advisable to have at least 2 site owners.
Site owners are able to grant and remove access for other users.
Site members
By default site members can also grant access and share. This can be further restricted so that only site owners can share access.
Site members have 'Edit' ability over the site to create share and edit the site, and documents within.
Site visitors
Site visitors have ‘View’ permissions to see pages and documents. It is important that you set up this group carefully. Your content may be visible to users who should not have access if you do not set this correctly.
The best way to ensure the correct users have access is to use existing groups in the University central directory. We have created some central groups that you may find useful:
- uoc-users-staff: listed in the Cambridge Human Resources Information System (CHRIS) data feed as a current member of university staff
- uoc-users-students: listed in the Cambridge Students Information System (CamSIS) data feed as a current student
- uoc-users-cam-upn: all University user accounts. This includes staff and students who have an email address ins the format [crsid]@cam.ac.uk. It does not include guest or alumni accounts
If you are using a SharePoint site for your institutional intranet you can also use the format:
<your institutional code>-members-from-chris.
This gives access to all your institutional group members listed in the CHRIS. You can find your institutional group code in Lookup by searching for your institution. The institution code is in the URL for the institution page. Find out how to add groups below.
If you want to set up a new a group, your local IT team or HR staff should be able to help you set up something called a Toolkit group. We have information on how to manage groups with Toolkit for them to refer to.
Adding individual users
For a Communications site you will see a ‘Site Access’ button instead of a member icon.
This brings up a list of users with access split into owner, member and visitor groups.
When you add a new user it defaults to granting ‘Read’ access which will add them to the Visitor group.
`Use the drop-down to amend to Full control (Owner) or Edit (Member) as required.
Adding user groups
If you’re using a SharePoint communication site for your intranet, we recommend you use existing groups in the University central directory or toolkit groups to grant permissions. Avoid adding individuals where possible.
Select the settings cog at the top right of the SharePoint site, and select 'Site permissions':
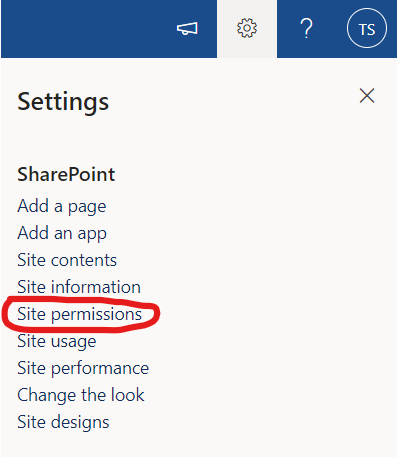
This opens up a 'Permissions' panel:
You then need to select ‘Advanced permissions settings’. Select the ‘Visitors’ group from the list of group. On the next screen, select ‘New’.
You can add the name of the relevant toolkit group in the name and email address field. Make sure you click on ‘Show options’ and untick the ‘Send an email invitation’ field before you select ‘Share’.
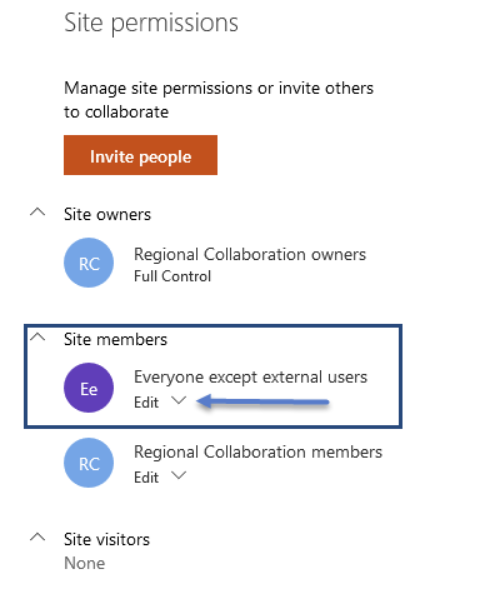
Site owners should ensure that "Everyone except external users" is not being used on their site. We would advise against this as this would include people in the University who are not staff, students or visitors. Instead, we recommend using the group "uoc-users-cam-upn".
Restricting site sharing permissions
Site owners can further lock down the SharePoint site so that only owners can grant access, rather than both owners and members, by selecting the 'Site Sharing' link in the 'Permissions' window:

This opens a panel to change the following options:
- site owners and members can share files, folders, and the site. People with Edit permissions can share files and folders.
- site owners and members, and people with Edit permissions can share files and folders, but only site owners can share the site
- only site owners can share files, folders, and the site
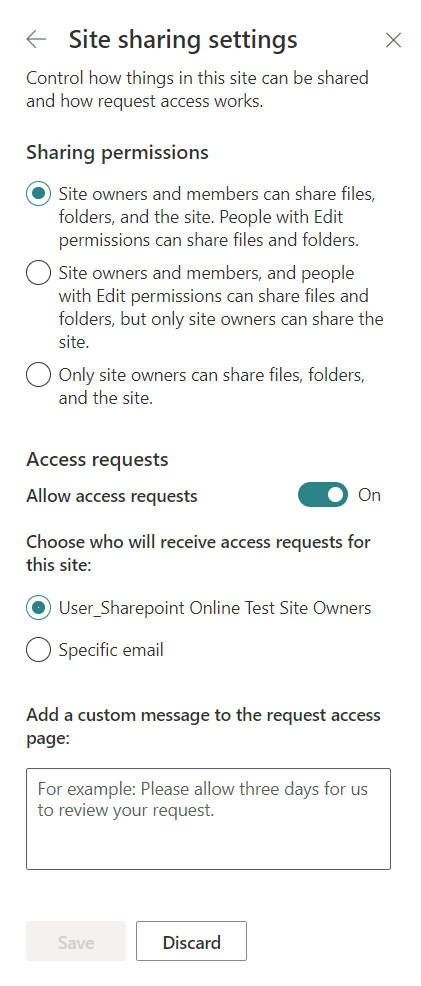
Site owners can choose the most appropriate settings for their site's purposes. The most locked-down setting would be for "Only site owners can share files, folders, and the site".
Owners of private sites for sharing within a team may also wish to turn off the "Allow access requests" feature.
Advanced permissions settings
Most site owners will not need to access the "Advanced permissions settings" link, but you can use it if you're confident and familiar with doing so.


