Steps for adding a new user
Here are the steps for adding a new user. Please ensure to complete all steps including step 4 settings. You can read some background information about the process further down this page.
- In the toolbar at the top, go to "Data" then "Users".
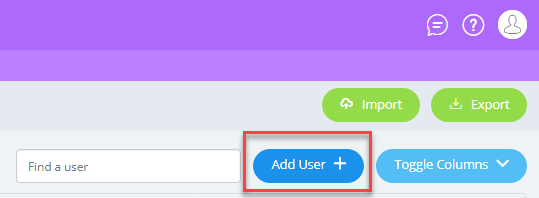
- Over on the right, select "Add User".
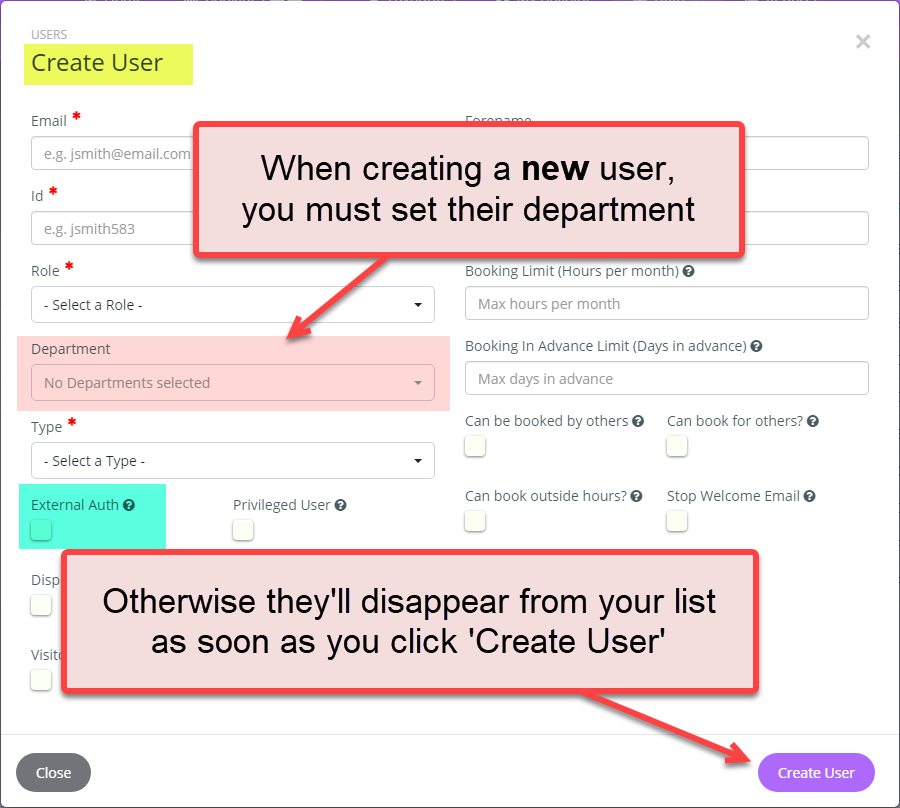
- Remember to add the user to your department, otherwise they will disappear from your list as soon as you select "Create User".
- Complete the remaining fields:
Field
Definition
Recommendation
E-mail
Enter the user e-mail address. Note: this is often used to log into the system.
For UoC users, use their @cam email address.
For guest users, use their supplied email address.
ID
Enter a Unique ID for the user e.g. a staff ID
Forename
Enter the user’s first name.
Surname
Enter the user’s last name.
Role
Enter the role the user will have in the system - most users are a Room Requester.
Department Manager is responsible for:
- setting up rooms and users
- training Room Managers
- communicating with Room Managers and Room Requestors
- raising technical issues with UIS
Room Manager is responsible for approving room bookings
Room Requestor is able to make room bookings
Custodian is a service provider in each department who look after aspects of the booking such as room layout, catering, facilities needed.
Department
Select from the list box the department(s) a user can be assigned.
Must be filled in, otherwise the user will be invisible to you.
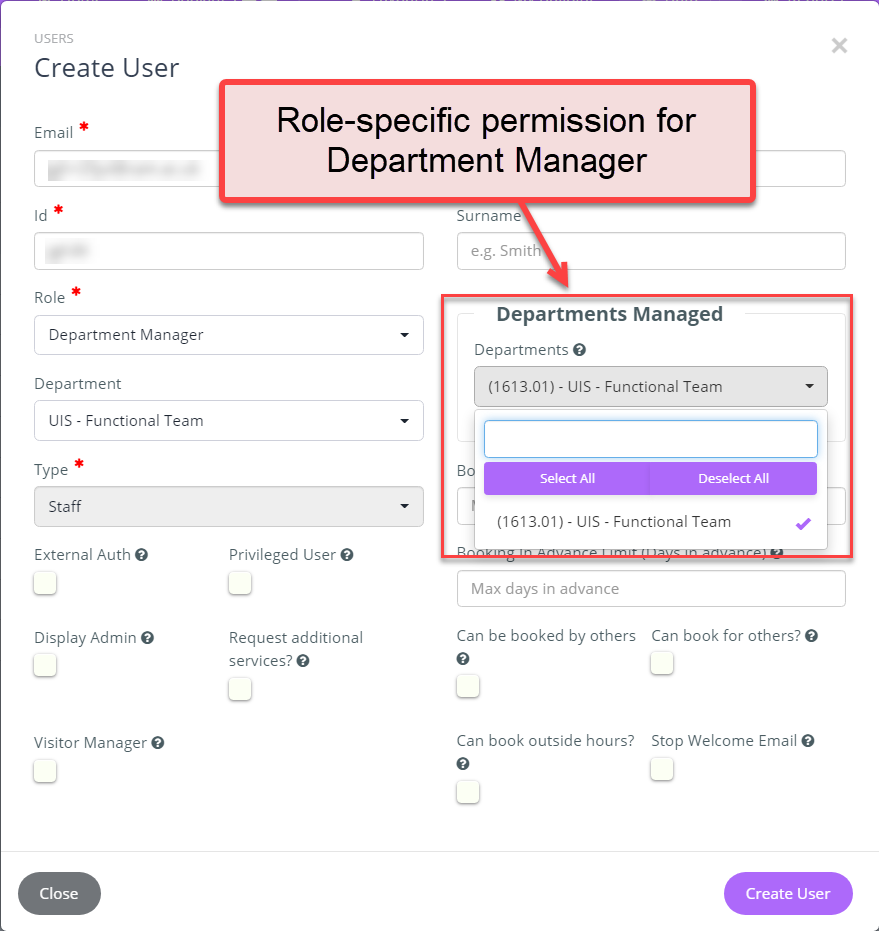
Departments Managed
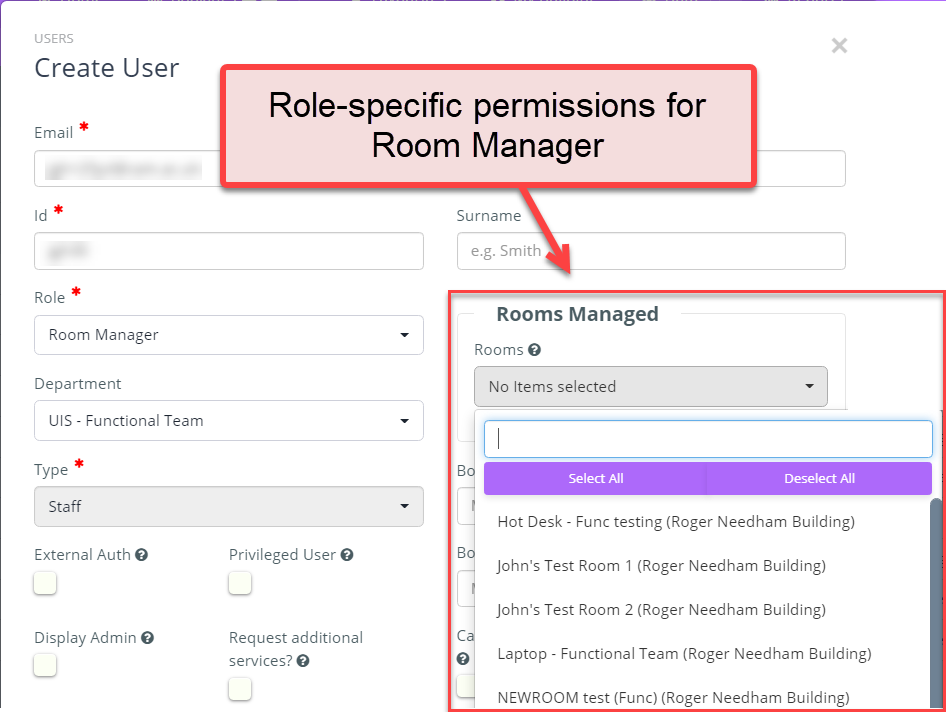
Rooms Managed
These are role-specific fields, amd will only appear on the form if the roles of 'Department Manager' or 'Room Manager' are chosen.
See the images below.
For a Department Manager, choose the department they will be managing. If you leave it blank, they will just be a Room Requestor in the department.
For a Room Manager, choose the rooms you want them to manage, you don't need to select all rooms, and each Room Manager can have their own collection of rooms to manage.
Type
Assign the user type e.g. “Staff”
External Auth
Set this flag if the user is using your organisation’s single sign-on authentication method to access the Booker system.
This must be ticked for UoC users, so they can login via Raven.
Leave unticked for guest users.
Optional fields on the Create User page
Field
Definition
Recommendation
Booking Limit
The maximum hours the user can book in a month.
Advanced Limit
How many days into the future a user can book.
Can be booked by others
Controls whether this person can be booked on behalf of.
Can book for others
Controls whether this person can book on behalf of others.
Privileged User
For users with “Room Requester” access; user’s bookings are automatically approved.
Outside hours
Controls whether a user can book outside the normal operating hours of the room.
Display Admin
Used in conjunction with Room Display software; allows the user to configure the display screens.
Additional Services
Controls whether the user can request services such a change of room layout when making a booking.
Usually ticked for all users
Visitor Manager
Controls whether the user can see the Visitor Manager Screen.
Stop Welcome Email
If this is checked, stops newly created user from receiving a welcome email.
If you're adding a Department Manager
After you've created a user with the role of Department Manager you would normally add the user to the Department in the "Departments Managed" field.
Otherwise they will be a Department Manager, but not managing any of your departments.
They may be a Department Manager somewhere else, but just a Room Requestor in your department, so in this case it's OK to leave this setting as it is.
If you're adding a Room Manager
After you've created a user with the role of Room Manager you would normally choose the specific rooms that they will manage in the "Rooms Managed" field.
Otherwise they will be a Room Manager, but without any rooms to manage.
They may be a Room Manager somewhere else, but just a Room Requestor in your department, so in this case it's OK to leave this setting as it is.
- Select "Create User" to finish.
After you've created a Custodian
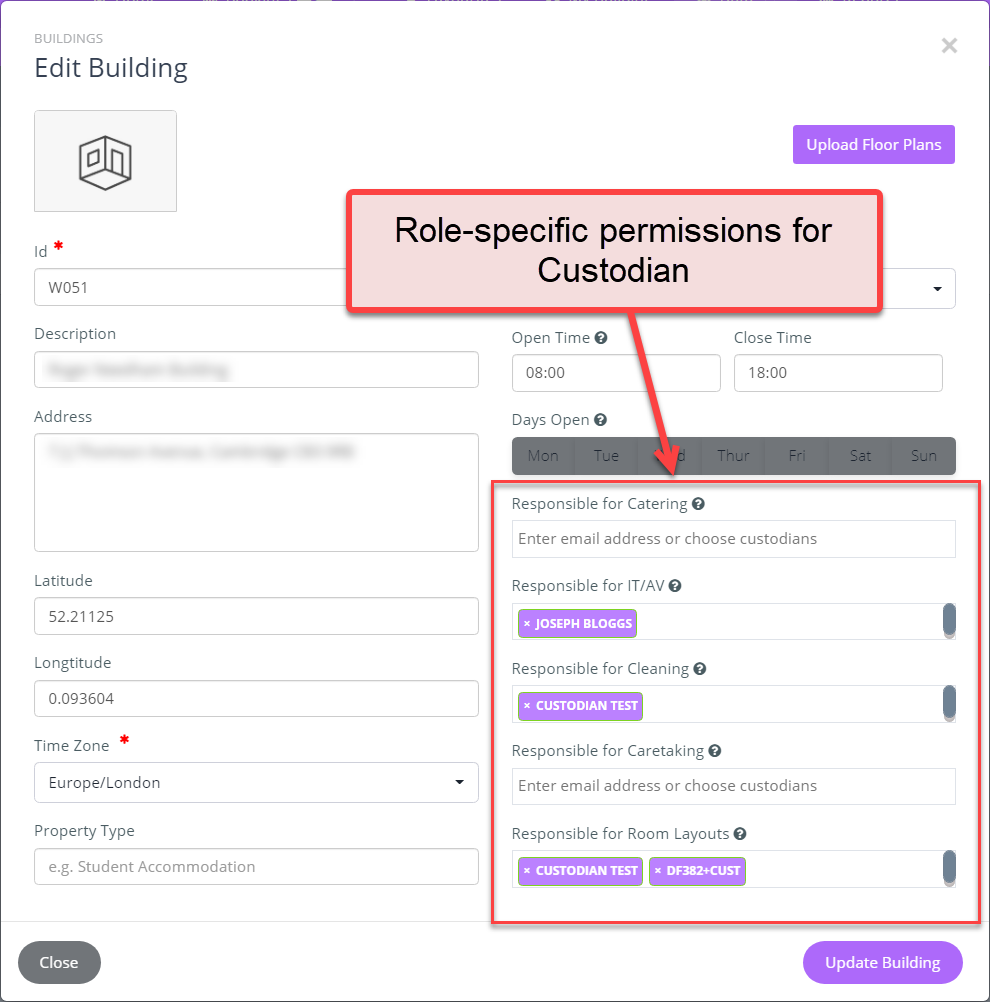
After you've created a Custodian you must go to the relevant building and add them to that building.
Otherwise they will be a Custodian, but without a building to manage.
To summarise:
- For all new users of any type – add them to your department
- For newly added Department Managers – choose the specific department(s) they will manage in the Departments Managed field
- For newly added Room Managers – choose the specific room(s) they will manage in the Rooms Managed field
- For newly added Custodians – go to the building and add them to the building
Background information
When adding a user there are a number of settings that need to be chosen: these are the 3 main ones.
- Role
- Department
- Role-specific permissions
Here is a summary for each role:
|
Role |
Department |
Role-specific |
Where to find role-specific settings |
|
Department Manager |
Choose your department |
Choose the department the new user will be managing. This of course will be limited to your own departments or sub-departments. |
Create/Edit User tab, Departments Managed section |
|
Room Manager |
Choose your department |
Choose the room(s) the new user will be managing |
Create/Edit User tab, Rooms Managed section |
|
Custodian |
Choose your department |
For a specific building, choose the Custodian responsibilities, e.g. Room Layout, Catering, AV |
Buildings tab > Edit Building |
|
Room requestor |
Choose your department |
No extra role-specific information needed |
N/a |
In the case of adding a new Department Manager, it seems odd to have to add the department twice: once in the ‘Department’ setting, and again in the ‘Departments Managed’ setting, especially if you look after only one department.
However, it makes more sense in the case of more than one department. As users can have only one role, they’ll need to have the Department Manager role for managing at least one department. In other departments they are in they may just be a normal Room Requester. So the ‘Departments Managed’ field is used to enable a user to be a Department Manager in that department.
This table shows what happens as each field is filled in.
|
|
Role |
Department |
Departments Managed |
Result |
|
1 |
Department Manager |
None |
None |
User has the role, but they are not yet a member of any Departments. |
|
2 |
Department Manager |
Your department |
None |
User is now a member of your department, but don’t yet manage any departments, so they get the basic permissions of a Room Requestor. |
|
3 |
Department Manager |
Your department |
Your department |
User is now a manager of your department. |
The same principle applies to adding new Room Managers and Custodians.
Ghost users
While the Role field is mandatory, the other two settings are not. This means that you can inadvertently create a user without a department or role-specific permissions.
If you add a new user without choosing a department, they won’t appear on your list of users: although they’re in the system they will be invisible to you. The remedy is to contact the Booker helpdesk at roombookingsystem@uis.cam.ac.uk with the details of the new user, and ask them to fill in the correct department for you.
Existing users from other departments
There is another case where trying to add a user will fail. A user can be linked to more than one department, so if your new user is already in Booker in another department you’ll see a brief error message in the top right of the screen, just after you select Create User.
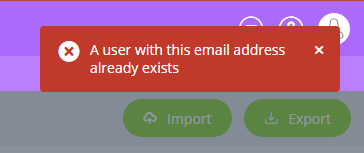
You need to email the Booker helpdesk at roombookingsystem@uis.cam.ac.uk to get the user added to your department.


