Upload and embed Panopto content through Moodle
You can use the Moodle rich text editor to upload and embed content in the Panopto folder or into the Moodle course. If you are a Panopto user with a 'Creator' role or higher you can upload content using the Panopto desktop client.
Upload and embed a video or audio file to a Panopto folder via the Moodle text editor
Embed a video or audio file into the Moodle course via the Moodle text editor
You can also use the Moodle rich text editor to create Labels, Pages or Books in Moodle.
Embedding content can present issues in some circumstances:
- The method for authenticating to view embedded videos uses Tokens, which require a popup window to load and automatically sign users in to view the videos. However, in some cases, users experience an additional sign-in screen, and behaviour can depend in some cases upon browser settings. See View embedded Panopto videos in Moodle.
- If the Panopto icon is not visible in the text editor, either the Moodle course does not have a Panopto folder or your role in the course does not allow you to create Panopto content.
Upload and embed a video or audio file to a Panopto folder via the Moodle text editor
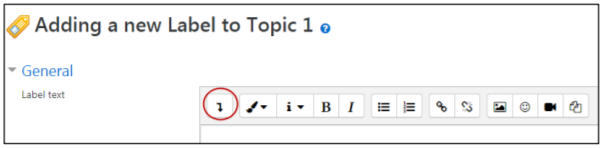
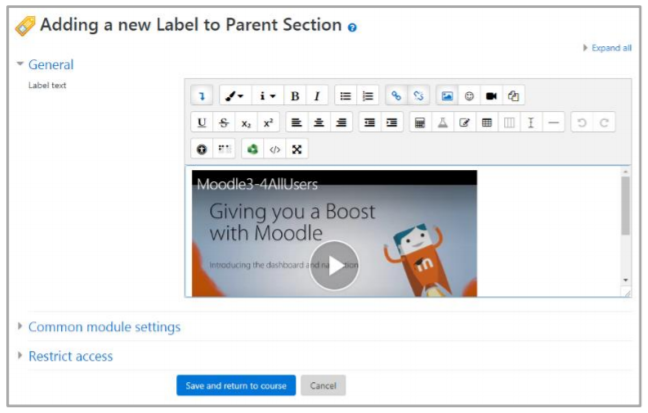
The example below uses a Label and assumes that the default text editor of Atto is being used.
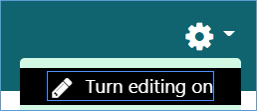
- Select the course Actions cogwheel and select 'Turn editing on' (or use Alt+Shift+E).
- Select 'Add an activity or resource' and choose to add a 'Label'.
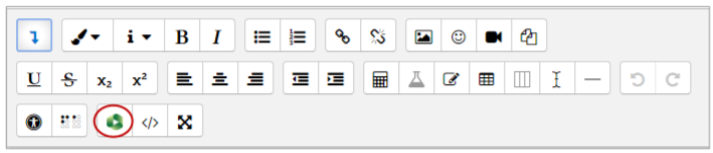
- Select the 'Show more buttons' icon in the top left corner to display the full range of icons.
- Select the Panopto button in the bottom row of options.
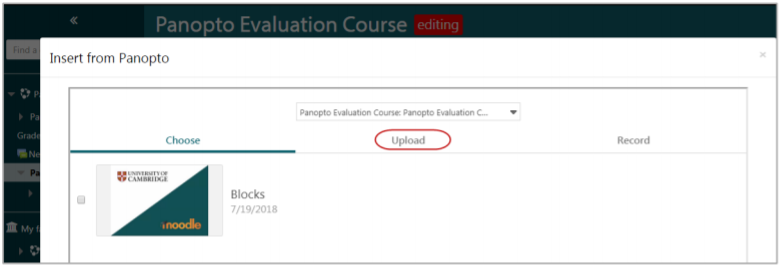
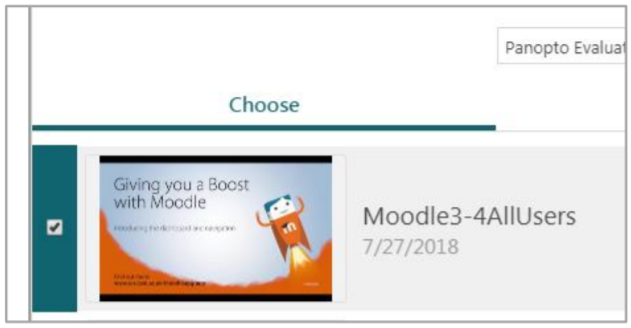
- An interface to select already uploaded content in the Panopto folder will be displayed. Select the Upload tab to switch the interface to upload a new video or audio file.
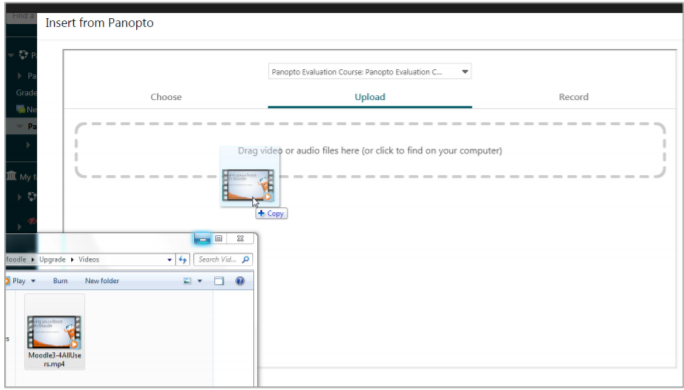
- Drag and drop one or more video or audio files into the dotted box, or click on the dotted box and select them from your computer.
- The file(s) will be uploaded to the Panopto folder that has been connected to this course and processed.
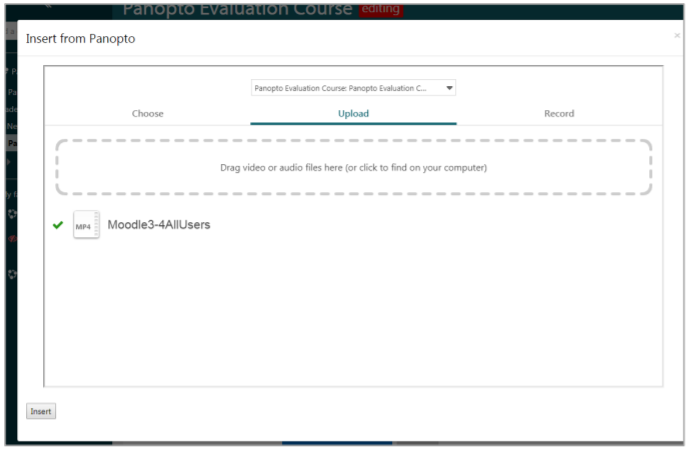
- Optionally select Insert (bottom left of the screen) to insert the video or audio file into the text editor. Alternatively, Select the X in the top right hand corner of the Panopto window to upload the video/audio file but not embed the file.
Note: The video or audio file does not need to have finished processing before it is embedded. If the video or audio file is not ready, a message will be printed on the bottom of the file: This video isn’t ready yet.
- Select Save and Return to Course and the video or audio file will be displayed if it was embedded:


Embed a video or audio file into the Moodle course via the Moodle text editor
All links to available videos will be displayed to students in the Panopto block, which sits on the right hand margin of the course.
Some course creators also prefer to put references to the video content directly into sections of the Moodle course, to give context. It is possible to put either a link to the URL of the video (copying the links given in the Panopto block) or to directly embed the video content via the rich text editor.
Anywhere that rich text can be added to a course, such as a Label, Page or Book, video or audio files in the course’s Panopto folder can be embedded.
Please note: Embedding content can present issues in some circumstances, so keep the points explained earlier in this guide in mind.
Also, if availability dates are applied to videos in Panopto, the Panopto block will automatically only show students links to available videos. If video content is added into the Moodle course, any restrictions on availability will have to be manually managed so that students don’t see links to unavailable content.
The example below uses a Label and assumes that the default text editor of Atto is being used.
- Select the course Actions cogwheel and select 'Turn editing on' (or use Alt+Shift+E).
- Select Add an activity or resource and choose to add a Label.
- Select the Show more buttons icon in the top left corner to display the full range of icons.
- Click the Panopto button in the bottom row of options.
- An interface to select already uploaded content in the Panopto folder will be displayed. Videos uploaded to the Panopto system, and added to the Panopto folder that has been connected to this course, will be shown.
- Select the tick box next to a video you wish to embed.
Note: Selecting multiple videos/audio files will only embed one into the course.
- Select Insert in the lower left of the Panopto window and the video will be embedded into the text editor.
- Select Save and return to course to return to the course and see the embedded video/audio file.


View embedded Panopto videos in Moodle
Since January 2022, Panopto has used Tokens to allow users to view recordings embedded in Moodle. The Tokens method requires an additional Panopto sign-in step where a popup window opens, which will either sign users in automatically or require them to select the sign-in button. No further credentials should be required.
Panopto recommends that popups are enabled, which will automatically allow a popup window for users to perform an additional one-time sign-in to view the recordings. They have produced some guidance on the behaviour that can be found here: Why Do I Have to Log In to View Embedded Videos?
However, some users have found the automatic popups distracting. It is possible to block popups and manually select to sign in to view the recordings and control when the authentication occurs.
The way this popup window behaves is dependent upon your browser settings.
With popups allowed
When accessing a course with an embedded session, you should see a popup window briefly appear, which is logging you in to Panopto in the background.
Once this process has been completed you should see the embedded video in your Moodle course ready to view.
Some users have reported that they are presented with a Moodle sign-in page or a Panopto sign-in page in a popup window, which requires the users to sign in again. In either case, select to sign in. It will present the Panopto videos ready for view.
If you see this additional sign in screen, select the correct login button (eg: Raven or Friends) to access the embedded Panopto videos.
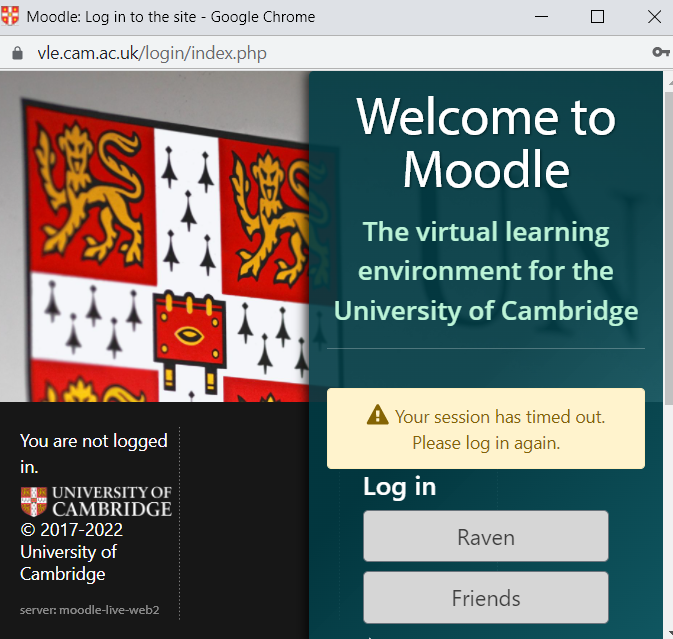
Some users are redirected to the Moodle sign-in screen upon re-loading the Moodle page. To resolve this, select to log in again (Raven or Friends), which will return you to the course page with the Panopto content viewable.
Note: Sometimes, due to personal configuration and setup, the additional sign-in can appear full screen, creating the impression the user has been logged out of Moodle. This is not usually the case, it is a full screen popup. Simply selecting to sign in again will remove the popup and load the content.
If you do not sign in again, this will continue to happen each time the page has loaded until you do so.
Note: You do not need to enter your credentials a second time; just select the sign-in button.
With popups blocked
When accessing a course with an embedded Panopto session the browser will block a popup in the background.
To view the embedded video, you will need to ‘Select to sign in and play video’. The embedded video should load automatically.

Some users have reported that they are presented with a Moodle sign-in page or a Panopto sign-in page in a popup window, which requires them to sign in again. In either case by selecting to sign in again it will present the Panopto videos ready for view.
The popup window for some users is Cambridge Panopto Sign-in, but some users see the Moodle Sign-in screen.
Note: For some users the popup window appears full screen.
You do not need to enter your credentials a second time; just select the sign-in button.
Browser cookies
To load all the videos upon sign in, Cookies must be enabled on your browser, or you will have to select to sign in and play video’ for each session.
If Cookies are enabled on your browser, you should not have an additional step to log in to view the videos when you access the course again.