Before you start
- Make sure you are in a location where the eduroam wireless network is available.
- You must be using Windows 10 and 11 to connect to eduroam. You can have a look at Microsoft's support website for information about to check your version of Windows.
- We strongly advise upgrading to the latest Windows version that your device can support. Older versions may have incompatible software or drivers. We currently support these versions of Windows:
- Windows 10, 22H2
- Windows 11, 22H2 (until Oct 2024) and 23H2
Step 1: Connect to UniOfCam-Guest wifi network temporarily
You need to be online while you set up eduroam. You should connect via UniOfCam-Guest or another local wifi network if your College doesn't offer UniOfCam-Guest. Or you could use a wired connection.
Step 2: Remove any existing certificates if you’ve connected to eduroam before
You do not need to follow this step if you’ve never connected to eduroam from this device before or if you’re using a University Managed Desktop device.
-
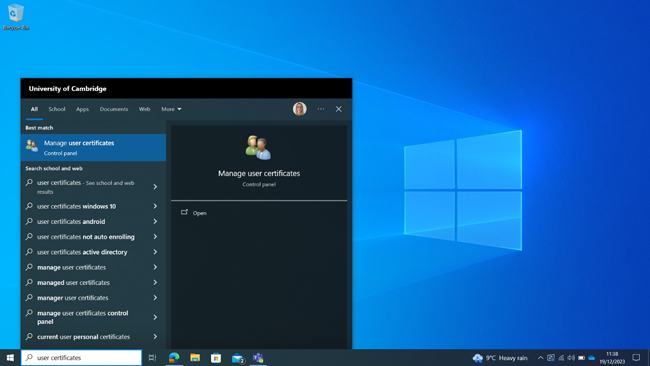
Go to the search box in the Windows start menu. Enter 'user certificate'.
-
Select 'Manage user certificates control panel'.
-
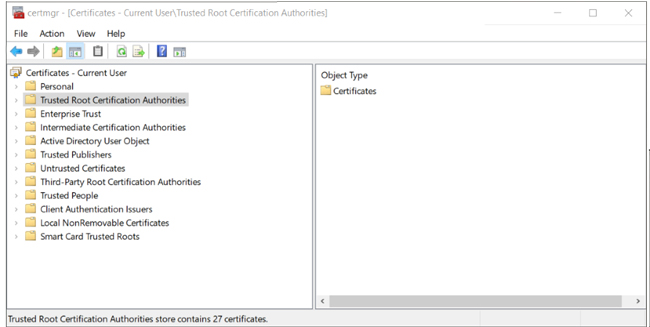
Find 'Trusted Root Certification Authorities' from the list of folders.
-
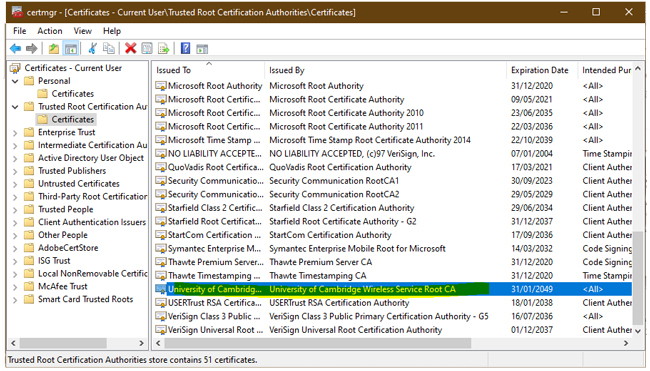
Scroll down the list of certificates to find the 'University of Cambridge Wireless Root CA' (this should be near the bottom of the list). If you do not see a certificate with this name, you can move on to step 3: create a network access token.
-
Right-click on this and choose ‘Delete’. Select ‘Yes’ on the warning message.
Step 3: Create a network access token
Create a network access token for your Windows device. If you've connected to eduroam previously we still recommend that you create a new network access token.
You need to create a separate token for each of your devices and for each service. For example, if you want to connect to eduroam and the UIS VPN from both your laptop and phone, you need to create 4 tokens.
Use a meaningful username following the format CRSid+laptopYYYY@cam.ac.uk. It may be helpful to add the year if you've created network tokens previously. For example, ab123+laptop2024@cam.ac.uk. You will need to use lower case.
Keep the window with the new network access token open as you will need this when you are asked to enter a username and password later.
Create a new network access token on the Networks Access Token website.
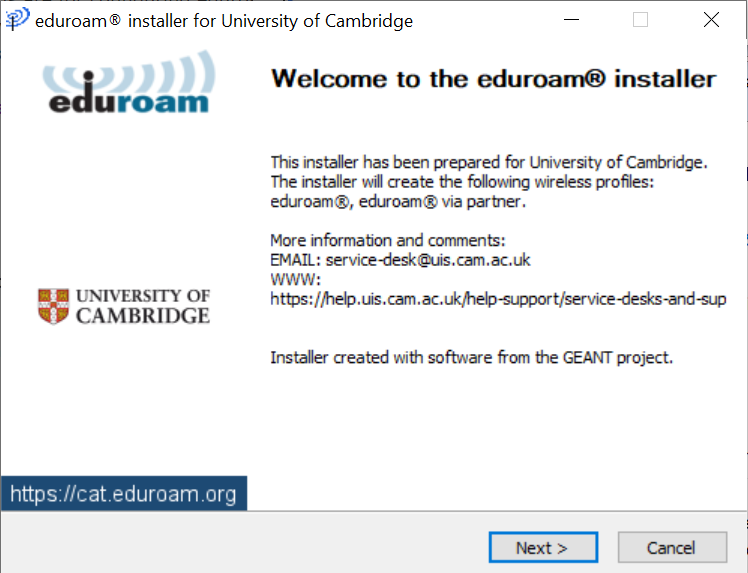
Step 4: Download the eduroam Configuration Assistant Tool (CAT)
You can use the eduroam Configuration Assistant Tool (CAT) to walk you through the set-up process.
When it asks for a username and password, you need to enter the network access username and password that you created in the previous step. Your username should be in the format CRSid+device@cam.ac.uk, for example, abc123+laptop2024@cam.ac.uk. Some browsers can add extra spaces when you copy and paste so if your password isn't working, try typing it instead.
Download the eduroam CAT for Windows 10 and 11
Step 5: Forget the UniOfCam-Guest network
You should now be connected to eduroam.
Finally, you need to forget the UniOfCam-Guest network or your local College wifi network, if used during the set-up steps. This ensures you will connect to eduroam wifi network whenever in range.
-
Go to the Start menu by selecting the Windows icon at the bottom of the screen.
-
Select 'Settings' then 'Network & internet' tab and choose 'WiFi'.
-
Select 'Manage known networks'.
- Select 'UniOfCam-Guest' and then 'Forget' to delete it.
Get help
If you're still unable to connect, please look through our troubleshooting guide or report an issue with the Service Desk.