You can add new sub-folders within Panopto and organise your recordings by moving them into the desired folders. New folders can either inherit the same access permissions and publishing settings as the parent folder or can be changed according to requirements. This can be useful for archiving and storing content, organising into subjects and topics for ease of organisation, or for giving specific content a unique sub-set of access permissions or publishing settings.
To create a new sub-folder, you will require Creator or Admin permissions within Panopto, this would typically be a Moodle coordinator or other users responsible for supporting and overseeing the use of Panopto within the department.
To move sessions from one folder to another you will require a creator role both in the folder from where you wish to move the session and the folder into which you wish to move the sessions. Creator roles in Panopto are automatically inherited from the Teacher role within Moodle.
Creating a sub-folder
1. Login to Moodle and from the course where you wish to add a sub- folder, access Panopto from the Panopto block by clicking on 'Course settings'.
2. You can close the settings window within Panopto to see your course folder contents.
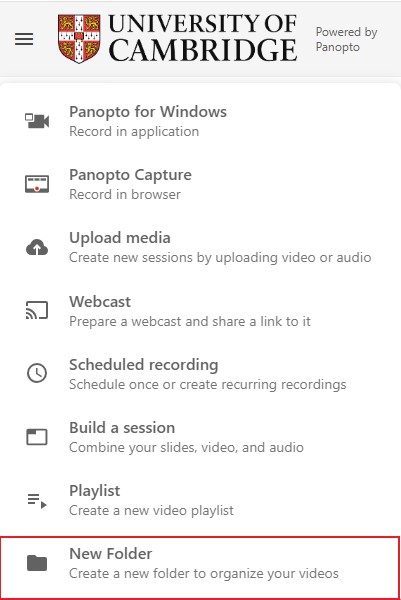
3. From here there are two ways of adding a new folder;
4. From the 'Create' menu, select 'New Folder'.
5. You will be prompted to give the folder a name that must be unique within the Parent folder.
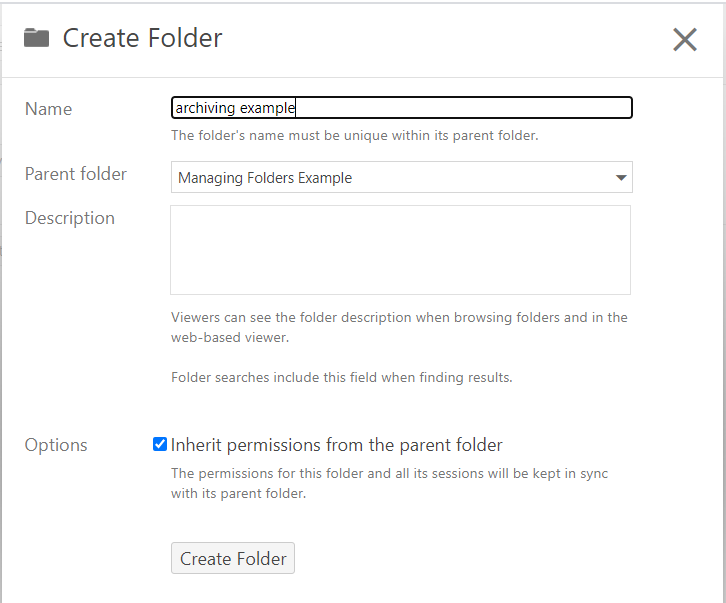
6. Select the parent folder within which to create the sub-folder (this will list all folders you have creator access to).
7. Select if you wish to give the folder different settings and permissions from the parent folder. This will typically be useful if you wish to store/archive content but do not wish students to be able to access at that point in time.
8. Upon clicking the 'Create' button the folder will be created, and the Folder settings window will automatically open on the 'Share' tab. From here you will see who has access to the content and you can edit access and other settings within the folder to suit your requirements. Any settings changes made are instant and there is no need to click the save button, simply close the settings window when you are finished, and the settings will auto save.
Moving recordings
1. Follow step 1 above to access the course from which you wish to move sessions.
2. Move your mouse cursor over the thumbnail of the sessions you wish to move and select the check box in the corner of each session you wish to move.
3. After you have selected the first clip you will see some additional folder 'action' menu items appear under the Folder title. Click the 'Move' button.

4. The pop-up window will show you the items you have selected along with a drop-down menu with all of the folders you have access to be able to move to.
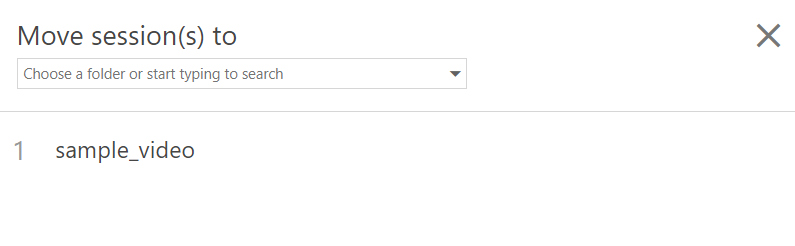
5. You can start typing the name of the folder you wish to move your sessions into, and it will auto-fill or you can navigate the drop-down list to find the folder.
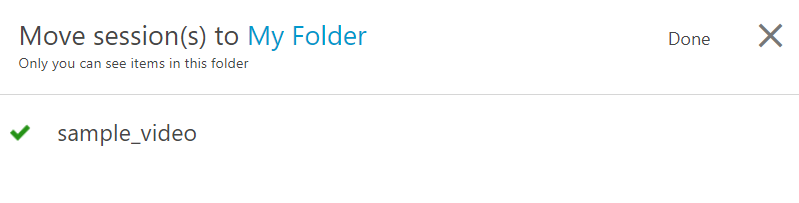
6. Once you have selected the location a 'Move' button will appear, click this to complete the process and move the content.
7. You will see a green tick next to the moved sessions and you can now close the window.
8. The content will no longer reside in the original folder but will be in the new location and subject to the access permissions and folder settings applied to the new folder.
My Folder
- Everyone with the Creator role on Panopto has a personal My Folder that is only accessible to the user.
- You can move sessions into your My Folder by following the instructions above for moving recordings and selecting My Folder for the new location.