Before you start
Make sure you are using a supported version of Windows. We support Windows 10 and 11.
ARM processors aren’t supported
Install Print Deploy Client on unmanaged Windows devices
1. Connect your computer to the University network via a wired connection or the VPN. You cannot download the install file unless you're on the network. Download and install the Print Deploy Client (31MB). Do not rename the downloaded file.
2. Sign in with your University IT account (formerly Raven) when prompted. If you are a University Library reader sign in with your library account details. Use [yourlibrarybarcode]@reader.lib.cam.ac.uk followed by your password. You will also need to use multi-factor authentication for security.
3. After signing in, some printers may install automatically. These are printers managed by your local institution.
4. The DS-Print_FindMe printer defaults to print to Sharp and Konica printers. This is only in institutions that use the Common Balance credit scheme. Use these printers if you want to pay for your printing using the Common Balance.
5. Install an institutional printer from the list to pay with your Local Balance. Institutional printers will debit from the institutional Local Balance. If your Local Balance runs out, you will be debited on your Common Balance. This only applies if the institution also uses the Common Balance.
Print Deploy on University Managed Desktop (UMD) Windows devices
Print Deploy is automatically installed on Windows UMD devices, so no installation is required.
If you need to reinstall it to fix a problem, follow these steps:
- Open the Company Portal. You can find it by opening the "Start" menu and start typing the name to search.
- Use the search box at the top of the Company Portal window to find "Print Deploy".
- Select the "PaperCut Print Deploy" item and then select "Install".
Install additional printers
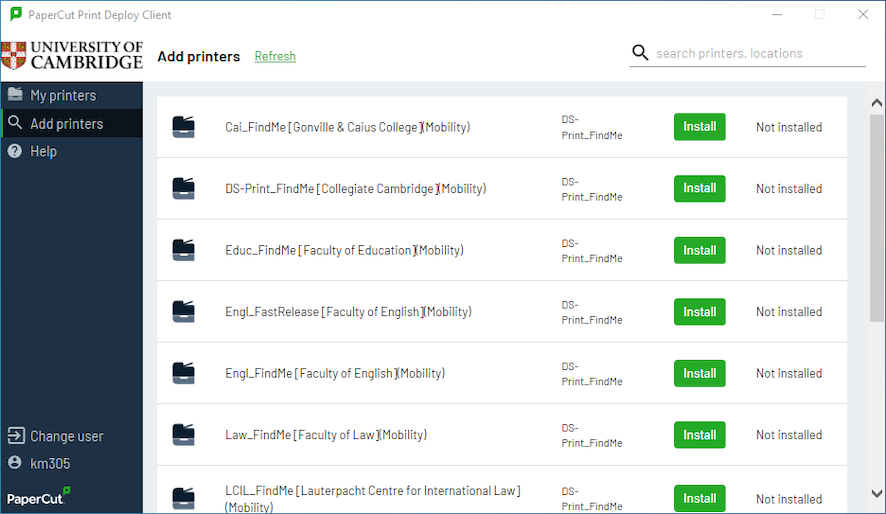
To find and install more printers, select the "Add printers" tab in the left menu.
Use the search box in the top right of the Print Deploy window to search for a printer. Printers are named InstitutionCode_Location. See Where you can print for a list of institutions using the Managed Print Service.
To add or remove printers, right-click the Print Deploy icon located in the taskbar.

