Configuring the UIS VPN on Windows 10 and Windows 11 devices
Before you start, you will need to know:
- your Network Access Token username and password
– create your token on the UIS Network Access Tokens site and keep the window or tab open, in readiness for when you'll need to copy the username and password.
- If you have been advised to use a Managed VPN, rather than the general University VPN service, you will need the VPN server hostname. Available VPNs and their server hostnames are listed on the Managed VPN page.
Setting up the VPN in Windows 10 and Windows 11
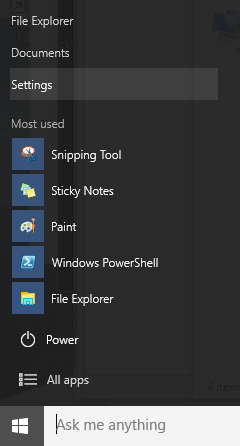
- Select Start > Settings to open the 'Settings' panel:
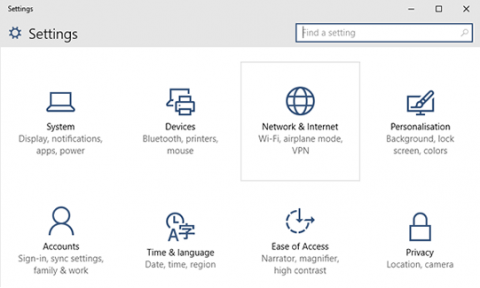
- ...and select Network & Internet:
- Select VPN from the list on the left. Add a VPN connection will appear – click on the + sign:

- Click in the VPN Provider window, which should add the text Windows (built-in).
- In the Connection name box, type Cambridge VPN.
- To connect to the main University VPN, in the Server name or address box enter:
vpn.uis.cam.ac.uk.
Alternatively, if you are connecting to an Institution's Managed VPN Service (not the main University VPN), you will need to enter its VPN Server hostname here instead (see the list of Managed VPN server hostnames to find this). - Click in the Type of sign-in info box, which should default to 'Username and password':
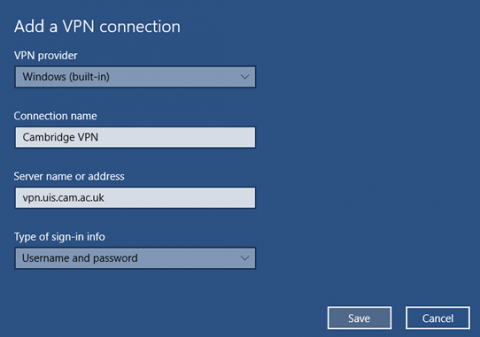
DO NOT add the username and password at this stage, but ensure that Remember my sign-in info is ticked at the bottom of the screen.
- Select Save, and this screen will disappear.
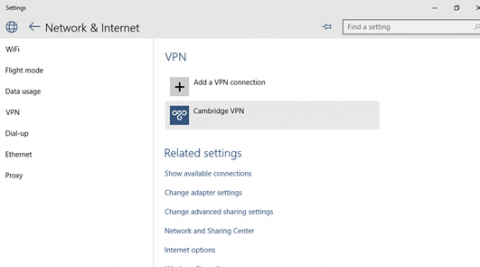
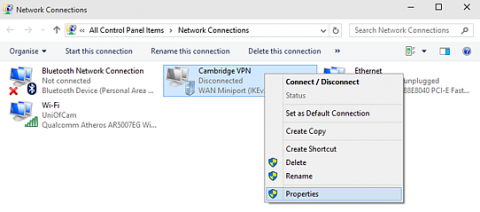
- You should now see the 'Cambridge VPN' icon; click Change adapter settings beneath it:
In Windows 11 you may not see the "Change adapter settings" option, in which case:- Using the Windows 11 search option, type 'Control Panel' (without the quotes)
- Select Control Panel app from the list that appears
- In the top right of the Control Panel window change 'View by' to 'Large icons'
- Click on 'Network and Sharing Center'
- Click on 'Change adapter settings' on the left hand navigation bar
- Right-click on the 'Cambridge VPN' icon (showing as 'Disconnected'), and choose Properties:
- Choose the Security tab, and under the heading Type of VPN, select IKEv2 from the drop down list:
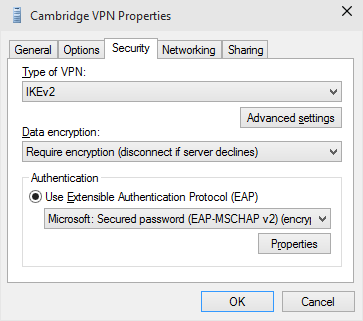
- Under the heading Data encryption, select Require encryption (disconnect if server declines).
- Under the heading Authentication select Use Extensible Authentication Protocol (EAP).
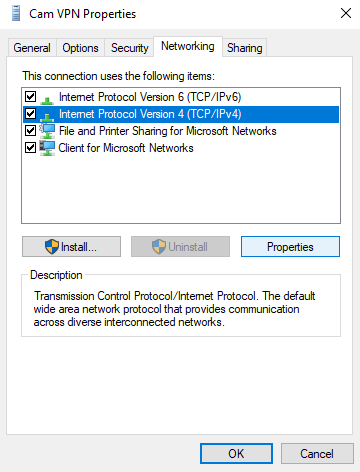
- Choose the Networking tab, then select Internet Protocol Version 4 (TCP/IPv4), and then click Properties.
- Select Advanced, and then select the IP Settings tab in Advanced TCP/IP Settings box.
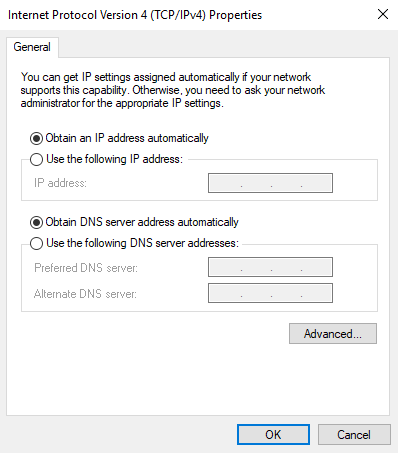
- Make sure that 'Use default gateway on remote network' is checked.
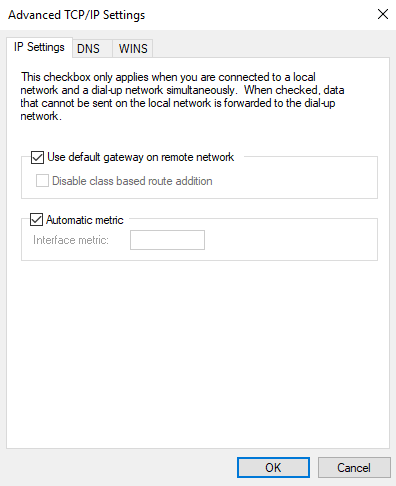
- Select OK and close the window.
Connecting to the VPN in Windows 10
- Select Start > Settings.
- Select Network & Internet.
- Select VPN and then click on the Cambridge VPN icon. A Connect box will appear.
- Click Connect.
- If you haven't done so already, create a Network Access Token on the UIS Network Access Token site, and keep the window/tab open so you can refer to the username and password.
- In the Username box, type your Network Access Token username, usually in the form CRSid+device@cam.ac.uk (e.g.
abc123+worklaptop@cam.ac.uk). - In the Password box, type your 16-character Network Access Token password.
Tip: Don't copy and paste the username or password because this can lead to spaces being added, which will lead to an error.
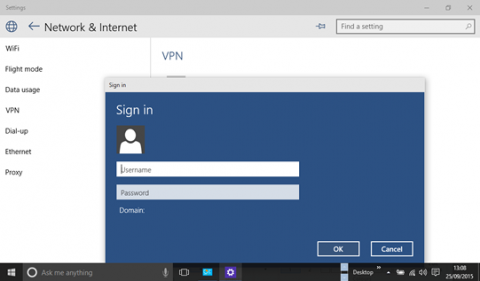
Hint: Check that the Remember my sign-in info checkbox is still ticked, if you want to log in automatically in future.
- Select the OK button. 'Connected' should appear below the Cambridge VPN icon.
Warning: Please be aware that traffic over the VPN is recorded and logged for security purposes
Disconnecting from the VPN after use
Click the Disconnect box on the right, below the Cambridge VPN icon.
Troubleshooting VPN problems in Windows 10
Continuously connecting
In a recent update to Windows 10 it has been reported that connecting to the VPN using the network icon in the system tray results in the status getting stuck at 'connecting'.
This is a known issue which Microsoft are looking into. The workaround is to connect to the VPN via Settings>Network & Internet>VPN
This should cause the credentials prompt to appear. If the credentials are saved, it should allow you to connect from the system tray icon in future.
IKE service status
If you have trouble connecting to the VPN or the connection just hangs, it may be that the required IKE service has not been started. To check:
- Go to Start > Settings.
- Search for Administrative Tools. Choose Services from the list:
- The IKE and AuthIP service status should be listed as 'Running':
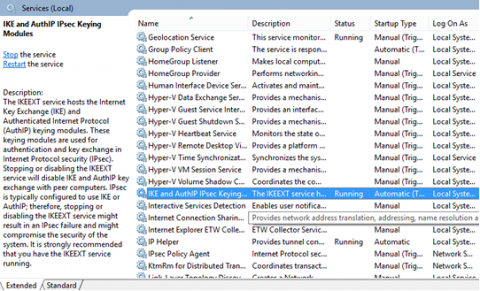
If it isn't, double-click to highlight the IKE and AuthIP line, and change the Startup type to Automatic.
Windows 10 "Policy match error"
If you encounter this error when connecting to a UIS VPN with a Windows 10 client, this means that Windows is not able to negotiate sufficiently strong encryption with the server. To fix it, you need to enable the stronger encryption in the registry. The easiest option is to modify the registry by hand, and update the key:
HKEY_LOCAL_MACHINE\SYSTEM\CurrentControlSet\Services\Rasman\Parameters\NegotiateDH2048_AES256
to have the value 1 (rather than 0 which is the default). To open the registry editor, please refer to Microsoft's documentation.
For more information, and alternatives for reconfiguring the Windows client, please see strongSwan's 'Windows Clients' documentation.
Still experiencing problems?
If you are still experiencing problems, please note which VPN you were using, the time at which you tried to connect and your current IP address (which you can find at https://myip.uis.cam.ac.uk/) and include these details in an email to servicedesk@uis.cam.ac.uk.