Configuring the UIS VPN on Ubuntu 20.04 LTS Desktop and Ubuntu 22.04 LTS Desktop
Caution! Due to the wide variations in Linux, these instructions are likely to be incompatible, or require adaptation to work, with versions of Ubuntu other than those listed.
Generic instructions for configuring the VPN service are provided, which may be helpful when setting up alternative systems.
Important note: The following are best-efforts instructions provided by the UIS Infrastructure division and will allow the VPN service be used from Ubuntu 20.04 (and newer).
Graphical method
Caution! Ubuntu 24.04 has partially broken StrongSwan packages. It is possible to have multiple packages both providing the charon service, but both being active leads to /usr/lib/ipsec/charon-nm (from strongswan-nm which is used by the GUI setup) installing routes in the wrong routing table. We recommend either removing the old ipsec based packages strongswan-starter and strongswan-charon, or only using the old ipsec method (below.)
Installing pre-requisites
The required packages, network-manager-strongswan and libcharon-extra-plugins, are in the "Universe" component of Ubuntu (which is not enabled by default). To enable this, you need to open "Software & Updates" (either by finding it in the list of applications, or running software-properties-gtk in a terminal). Once this is running you can check the appropriate box "Community-maintained free and open-source software (multiverse)" and close the window.
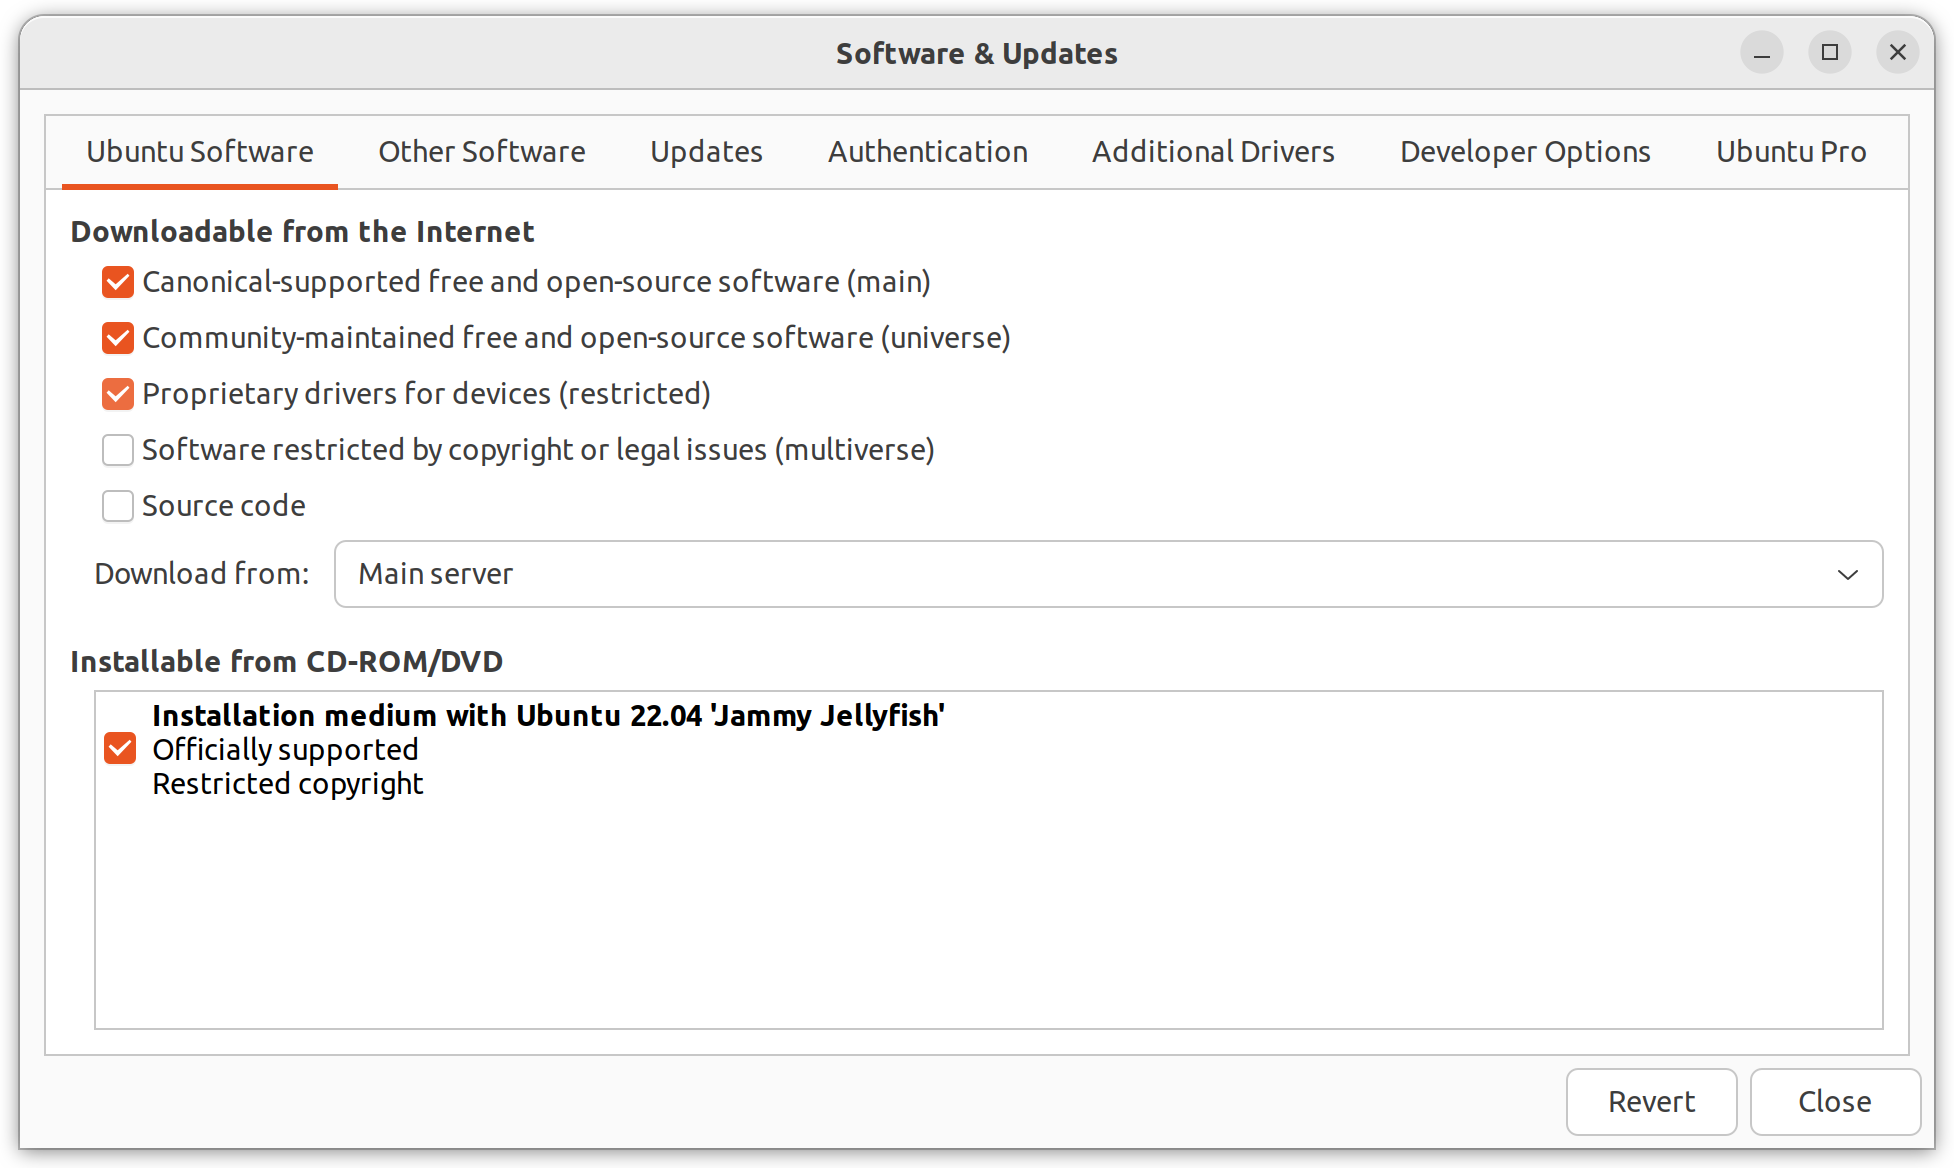
When closed, the system will prompt you to update the cached list of packages, which you will need to do in order to continue. Once this is done, if you are comfortable using the terminal to install software, issue the command:
sudo apt install network-manager-strongswan libcharon-extra-plugins
and jump to the Configuring StrongSwan in Network Manager section below. Otherwise, read on.
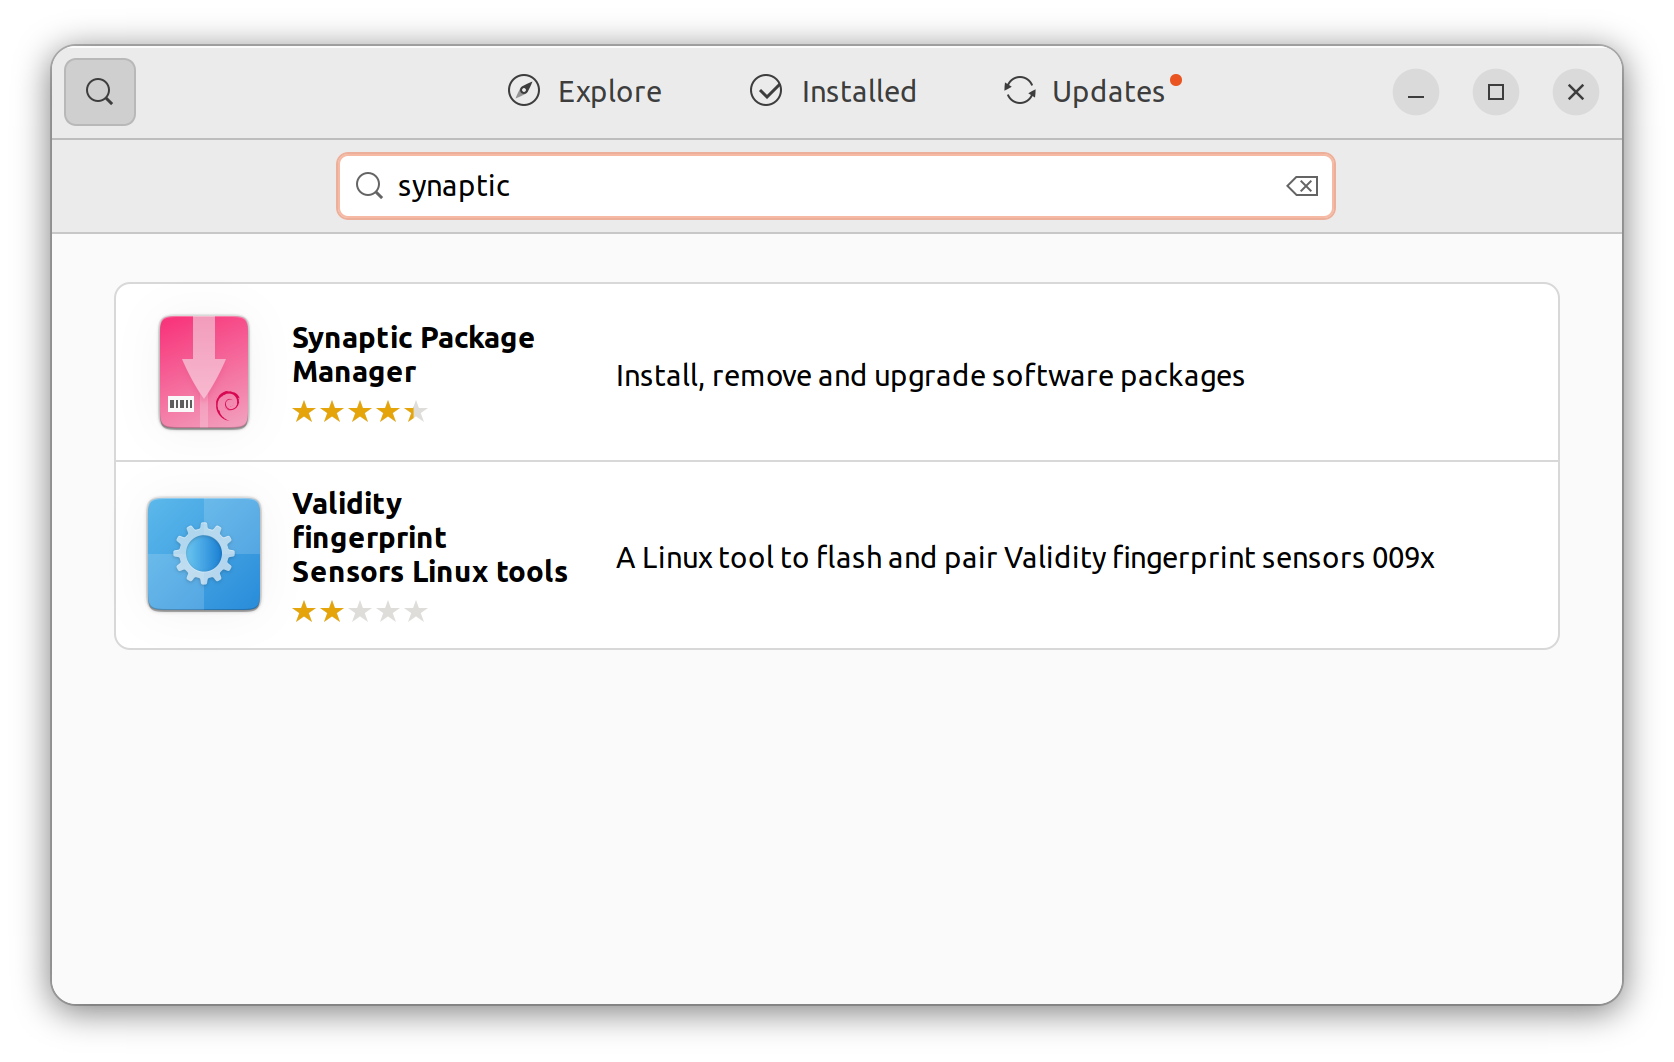
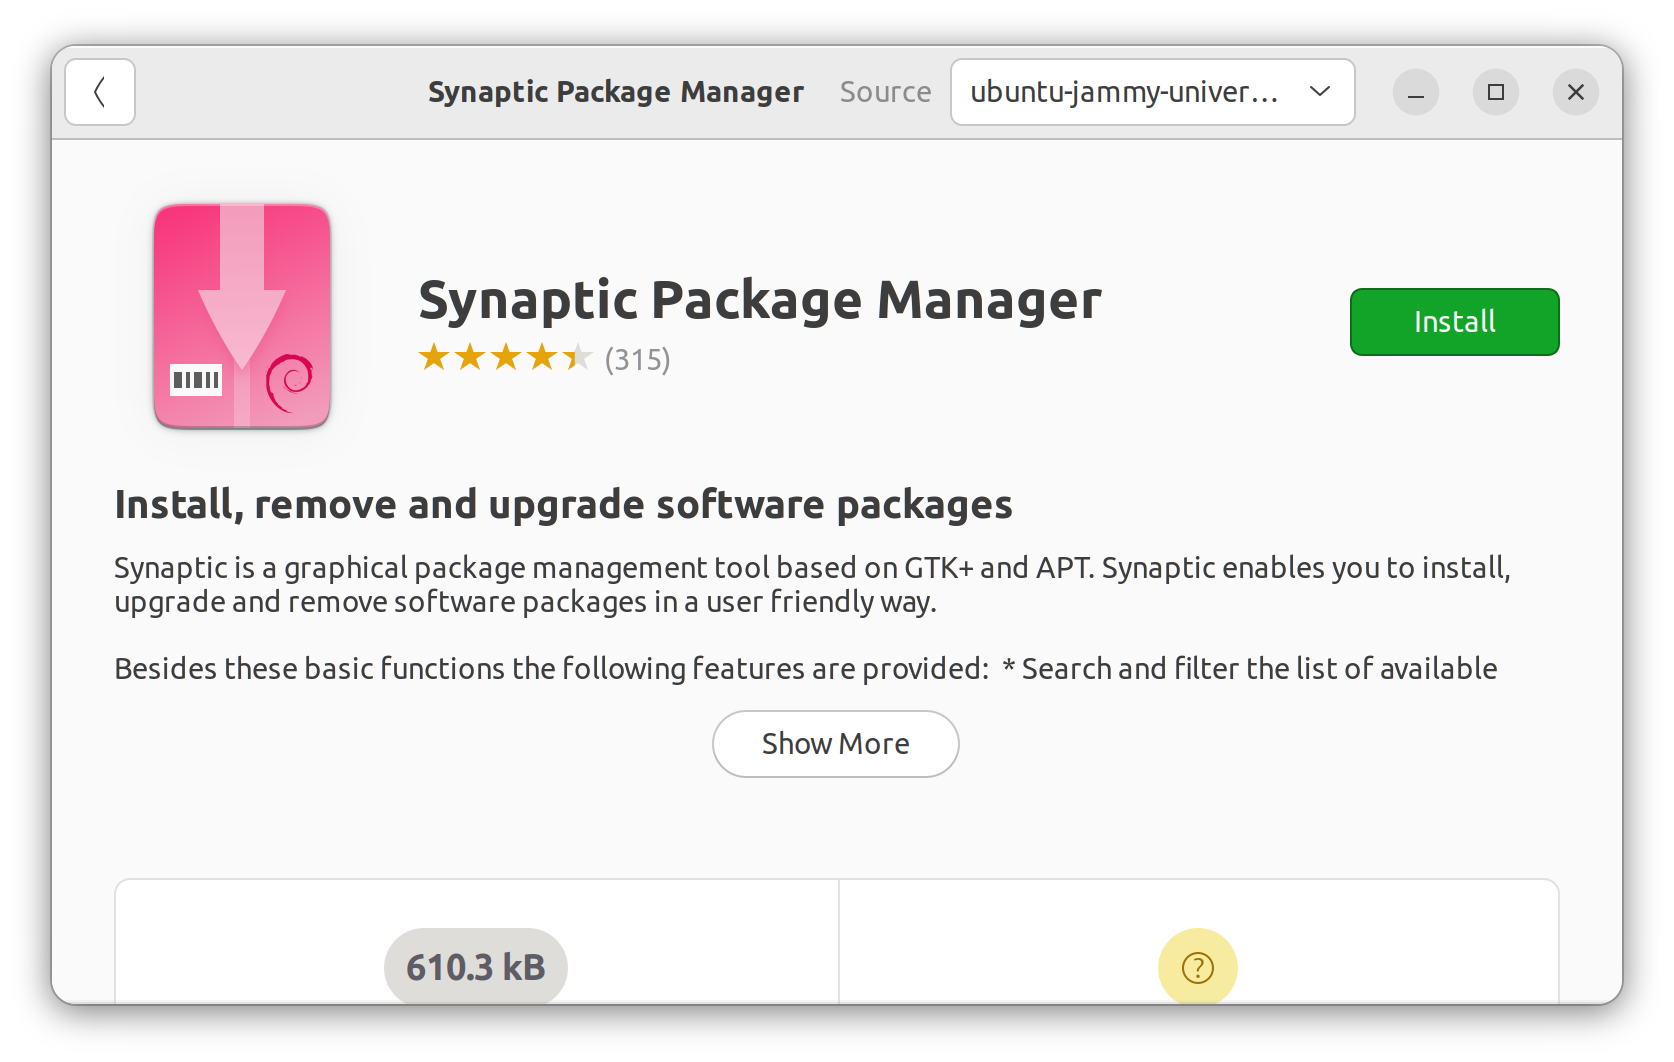
The required packages are not part of the standard install, so you will need to use Synaptic instead of the "Ubuntu Software" to install them. Open the "Ubuntu Software" application and search for Synaptic. Select it from the list of found items and choose "install."
Once Synaptic is installed, open it and search (top right) for strongswan. A number of packages should appear, you should install network-manager-strongswan and libcharon-extra-plugins by clicking the little square to the left and choosing "mark for install." You will be prompted to add any other dependencies automatically.
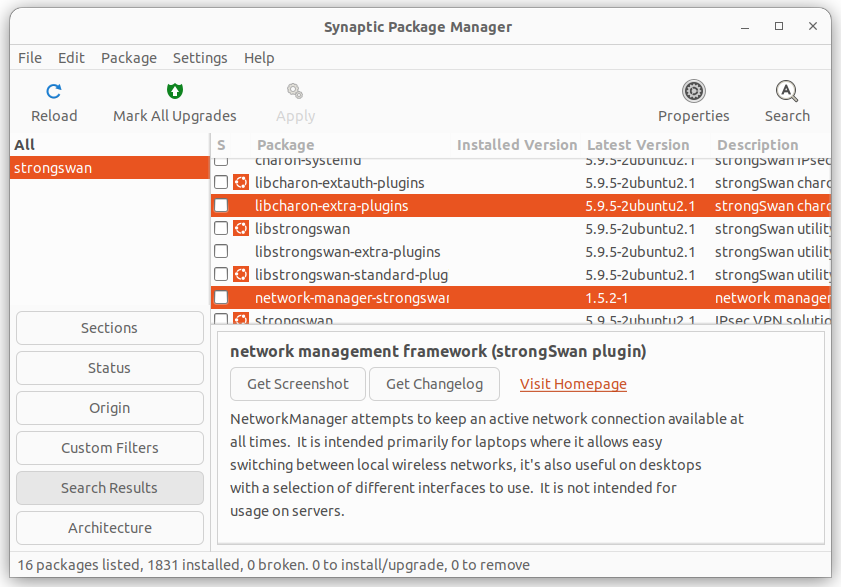
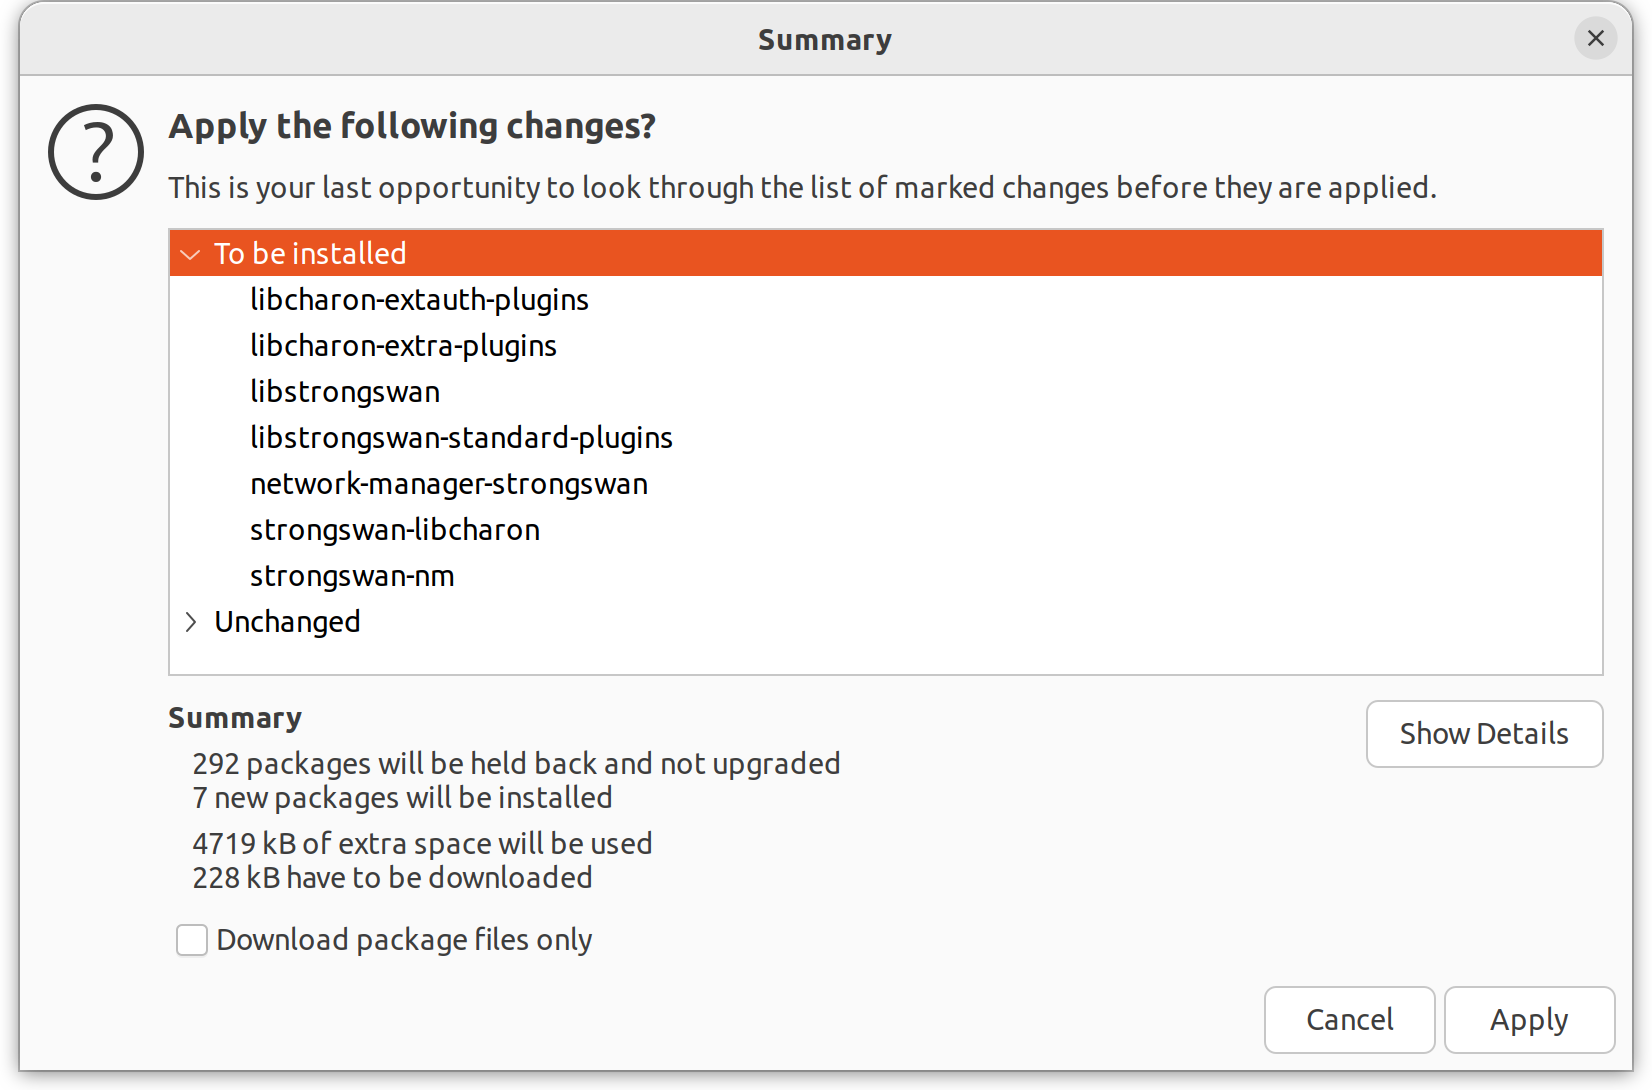
Once you have flagged the appropriate packages for installation you can click apply (top centre) to action the changes. Synaptic will show any pending changes:
Configuring StrongSwan with Network Manager
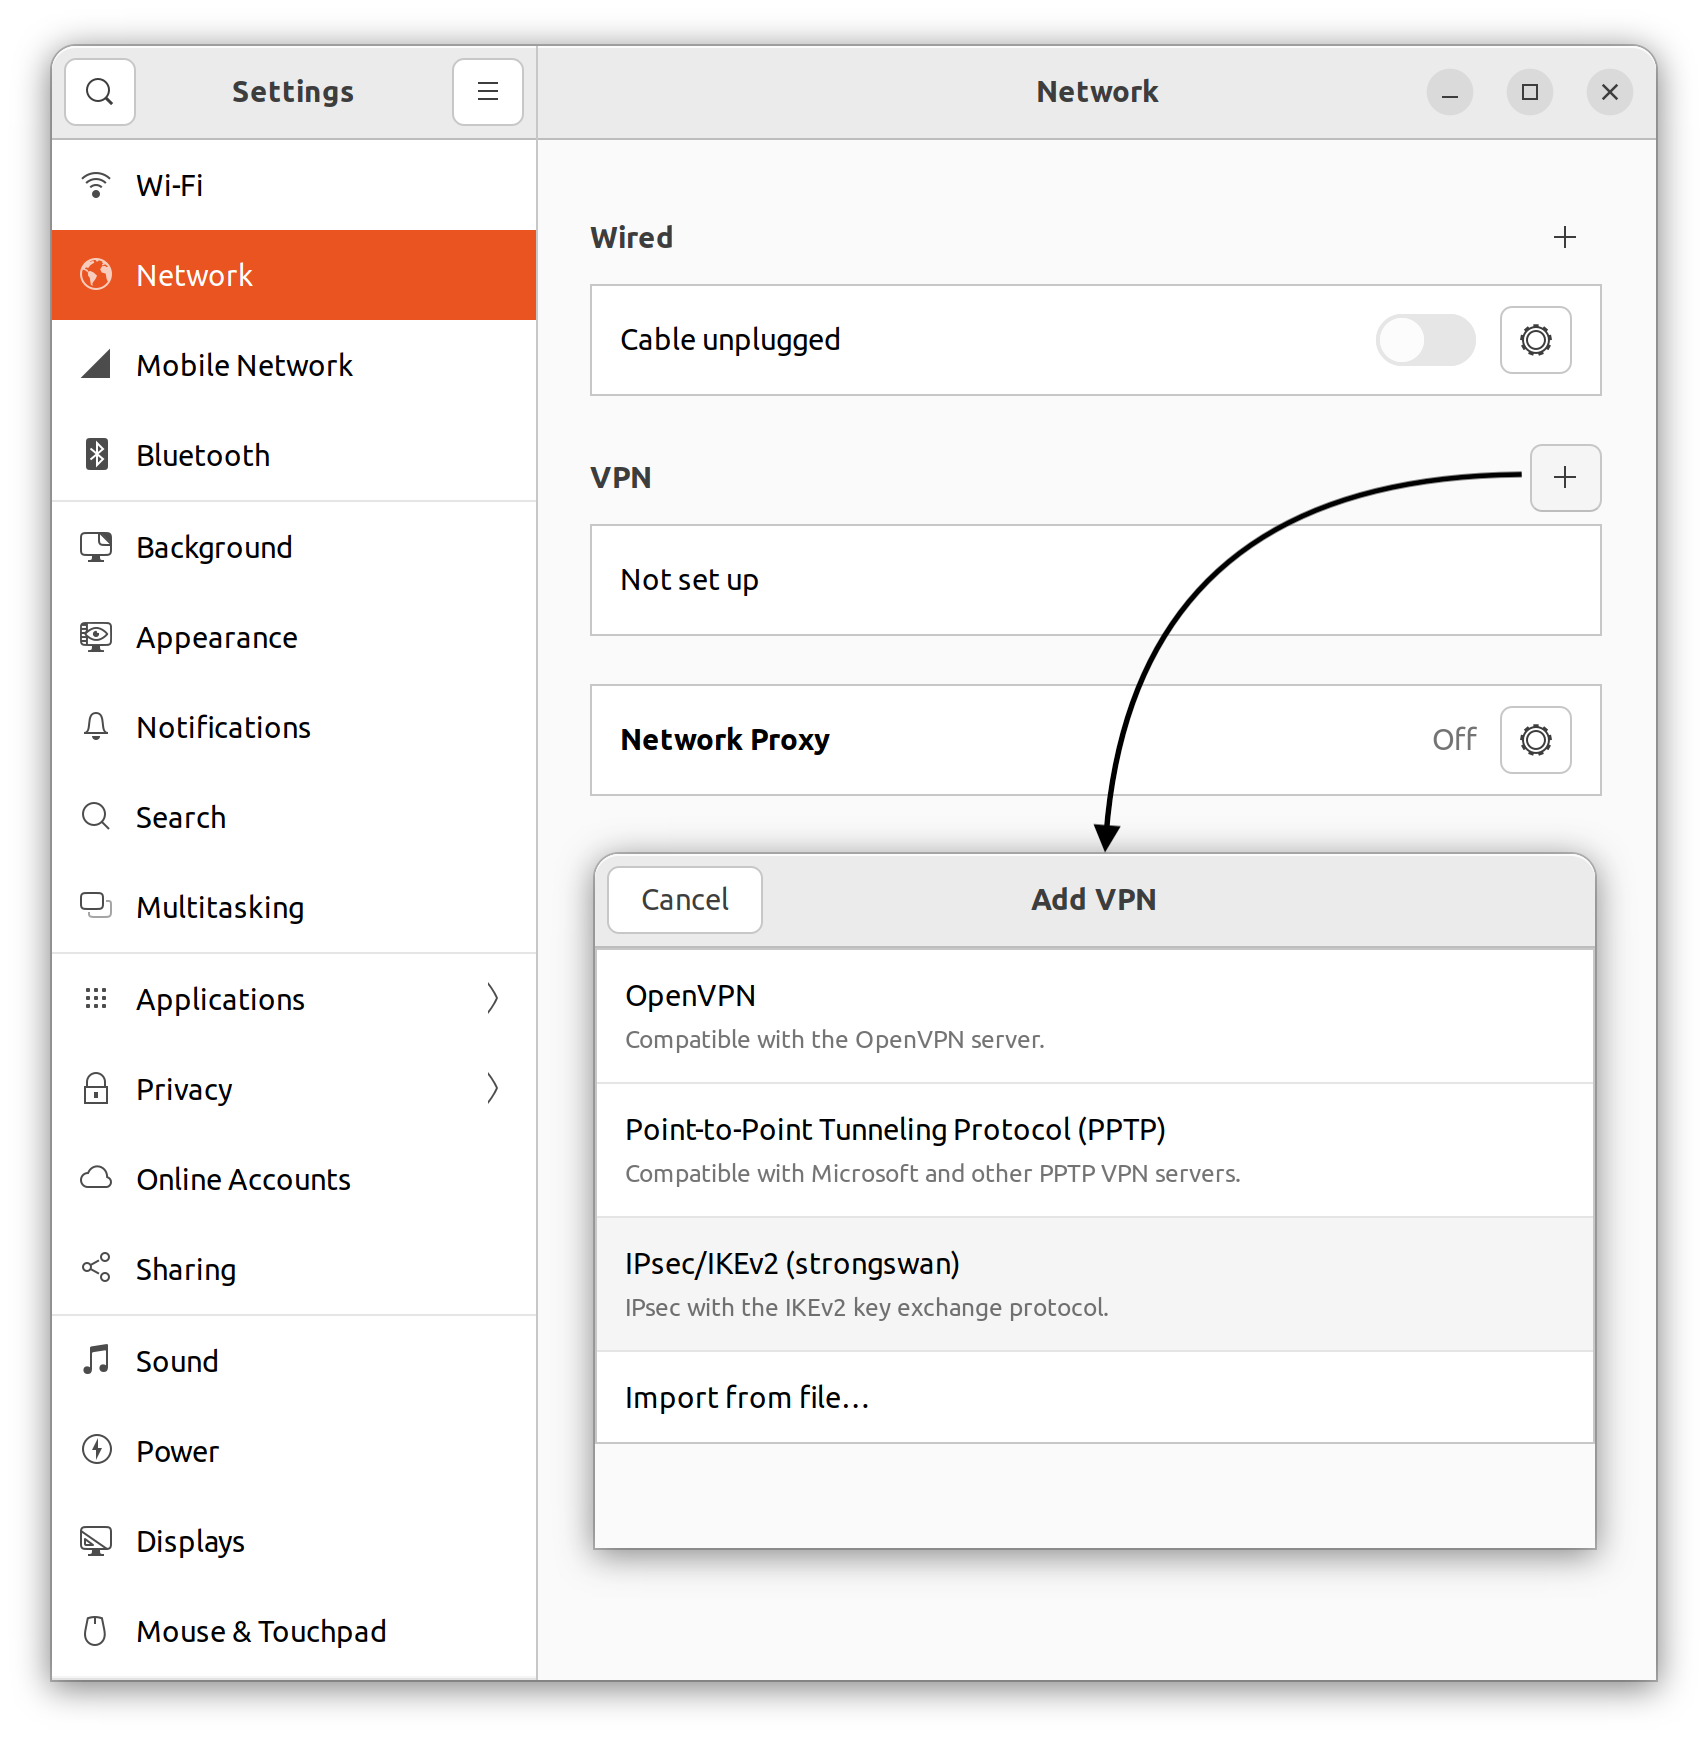
Open "Settings" and navigate to the network section. Locate the "+" button near the VPN label and click it. This should bring up a list of VPN types that Network Manager is aware of. If you correctly installed StrongSwan then "IPsec/IKEv2 (strongswan)" should appear on this list. Click it to bring up the configuration window.
The default configuration for the main UIS VPN is shown below.
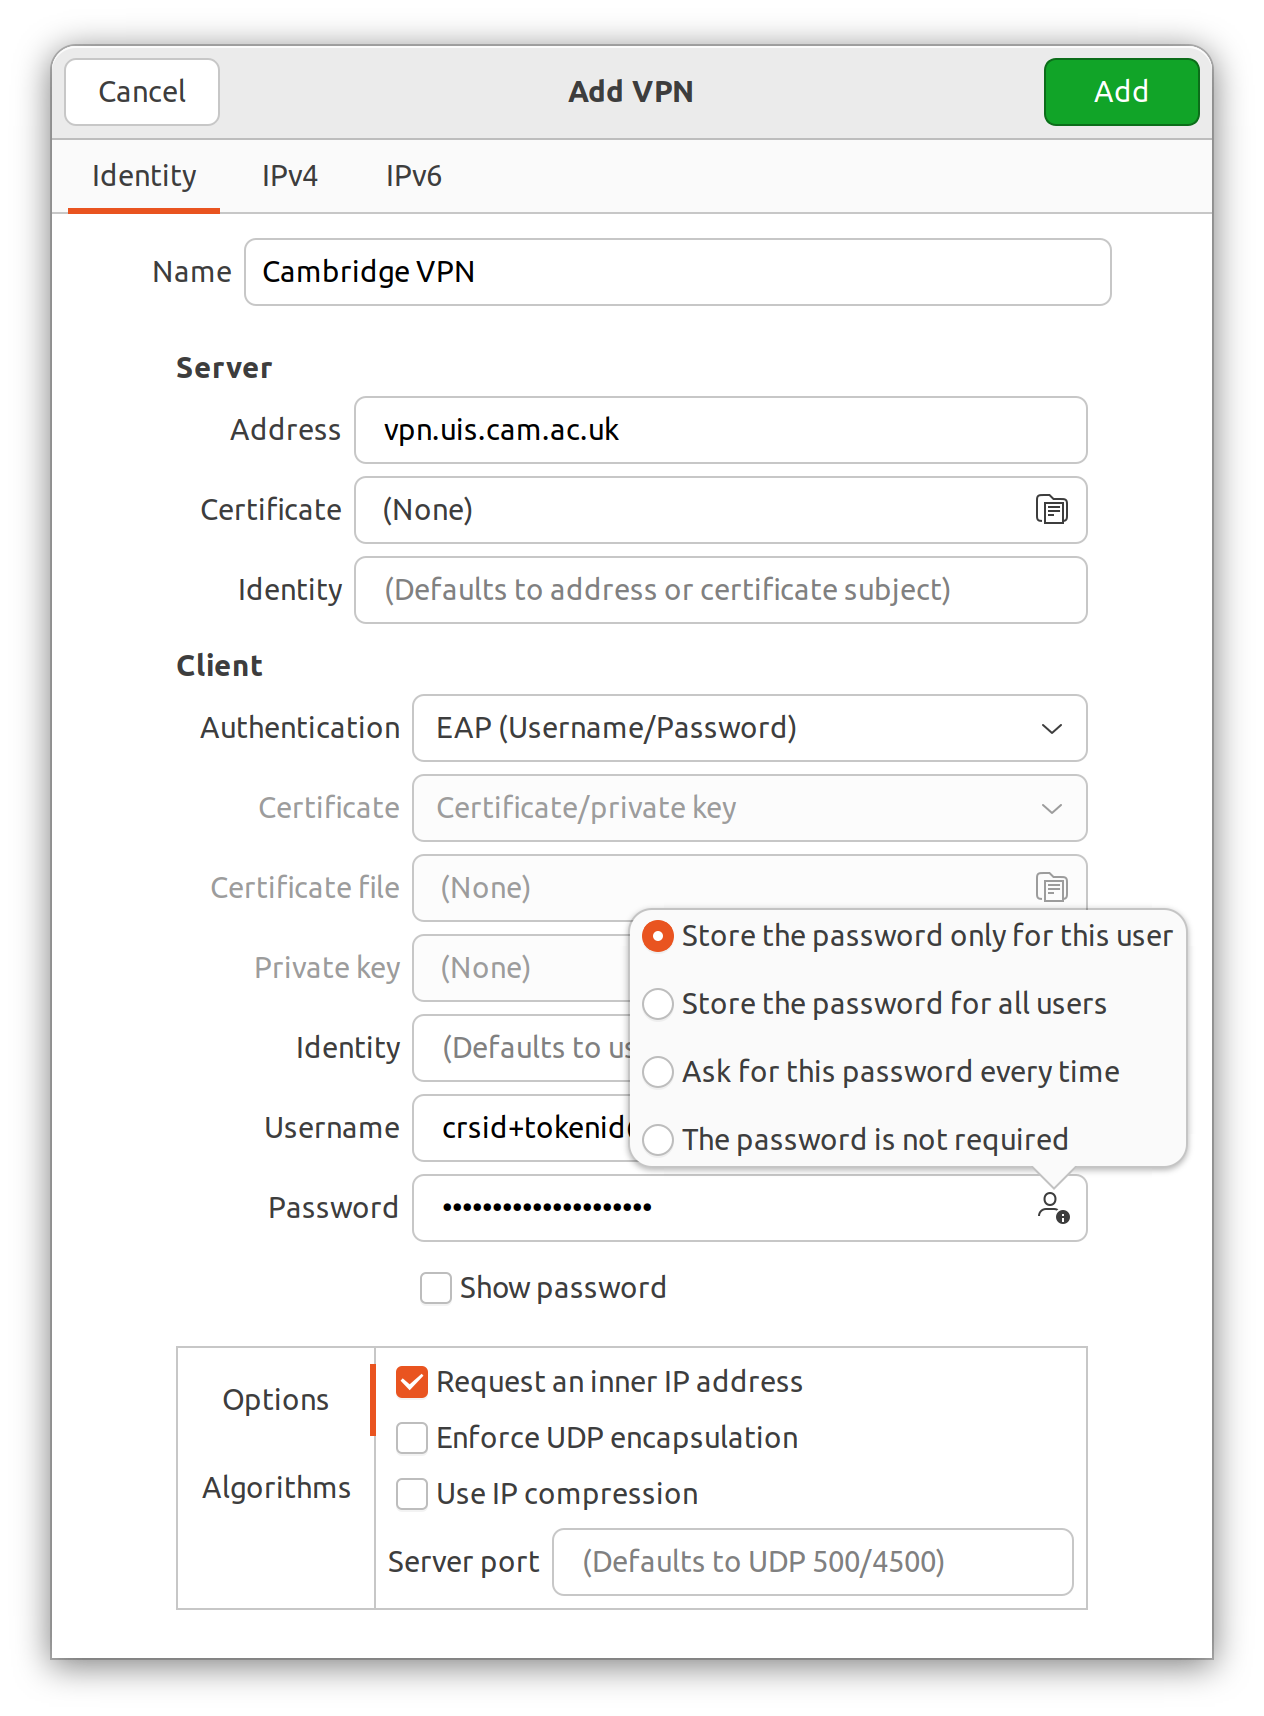
For the username, use a token username created on the UIS tokens site, along with its associated password. By default, the password will not be saved. To save it, click the icon to the right hand side of the password entry field. For managed VPNs you will need to change the server name, but probably nothing else. With this configuration the server's certificate will be checked against all certification authorities that your device has installed (the default Ubuntu selection works fine for the UIS VPNs).
Manual method
Caution! This method may not work on all managed VPNs, but it is fully tested on the Main UIS VPN.
Alternatively, the setup and control of the VPN may be performed using the command line (Terminal.)
StrongSwan is available for other distributions, and this document may help you with the setup of StrongSwan once you have obtained suitable packages for your distribution.
You'll need root access to your machine. All the steps below assume you are using a root shell (or know how to use "sudo" to execute commands as root) and have a reasonable familiarity with Linux (utilities, filesystem, editors, etc.)
For general information on configuration, see our generic instructions and information on our managed VPN service.
Install the StrongSwan packages
Various packages are required to support the VPN, from the StrongSwan family. They should be installed using "apt-get" but are in the "universe" Ubuntu repository, so unless you already have this configured, you must add this first:
sudo apt-add-repository -c universe
sudo apt install -y strongswan libstrongswan-extra-plugins libstrongswan-standard-plugins libcharon-extra-plugins resolvconf
VPN configuration file — ipsec.conf
# Append this to /etc/ipsec.conf
# If you have any existing connections which allow certificate based auth
# be sure they specify the remote sides DN either by DN or an actual cert.
conn CAM
  # Use IKEv2 and some sensible defaults
  keyexchange=ikev2
  ikelifetime=60m
  keylife=20m
  rekeymargin=3m
  keyingtries=1
  eap_identity=%any
  reauth=no
  # This section defines our ip, identifier and authentication protocol
  left=%any
  leftid=user+tokenid@cam.ac.uk
  leftauth=eap
  leftsourceip=%config
  leftfirewall=yes
  # This section defines the remote end's address, identifier and authentication
  right="vpn.uis.cam.ac.uk"
  # The full DN is required so the server knows which certificate to present and so we know which certificate to accept
  rightid="C=GB, ST=Cambridgeshire, O=University of Cambridge, CN=vpn.uis.cam.ac.uk"
  # Any CA in the chain of trust can be used, but seems sensible to use the root as it's already available
  rightca="C=US, ST=New Jersey, L=Jersey City, O=The USERTRUST Network, CN=USERTrust RSA Certification Authority"
  rightsubnet=0.0.0.0/0
  auto=add

# Example managed VPN. Uncomment and replace BOTOLPHS where appropriate. Inherits all unspecified settings from CAM
#conn BOTOLPHS
# also=CAM
# right="vpn.botolphs.cam.ac.uk"
# rightid="C=GB, ST=Cambridgeshire, O=University of Cambridge, CN=vpn.botolphs.cam.ac.uk"

# Because strongswan uses its own certificate store when ipsec.conf is active we need to import the root CA, which is widely available
ca AAA
  cacert=/etc/ssl/certs/Comodo_AAA_Services_root.pem
  auto=add
The fragment above should be inserted into /etc/ipsec.conf, just underneath the section starting "config setup". Substitute "username" with that of the Network Access Token you created for this device in the format CRSid+device@cam.ac.uk – for example "abc123+myhomelaptop@cam.ac.uk":
VPN password file — ipsec.secrets
The file /etc/ipsec.secrets needs to have the following two lines appended. Replace "username" with the Network Access Token username (as above) and "token" with the password, for this device:
# ipsec.secrets - strongSwan IPsec secrets file
user+tokenid@cam.ac.uk : EAP "token"
Certificate
The client needs to verify that the server is legitimate. This used to be done by having a copy of the server's certificate, however now we check that the server's certificate has been issued by a specific certification authority. This authority is saved in the ipsec.conf template above.
Connecting and disconnecting
To connect and disconnect from the VPN, you must use a command line (in a Terminal window).
You only need to do a 'restart' after changing configuration files (e.g. during the setup above, or updating the certificate). You then use the 'up' or 'down' commands to start or stop the VPN connection itself, as required. For example:
sudo ipsec restart
sudo ipsec up CAM
sudo ipsec down CAM
Replace "CAM" with "BOTOLPHS" (or other) to use an institutional Managed VPN.
Debugging
- Check /var/log/syslog for messages.
- Put charondebug="all" in the ipsec.conf configuration file.
- Periodically, the certificate used by the VPN server will need to be updated. When this happens, you will need to download and install the new server certificate and restart the ipsec service to reconnect. In this case, follow the instructions from the certificate section onwards.
- If you see intermittent hangs, you may have an MTU mismatch. You can sometimes solve this by setting the MTU of your network device – that is, change enp4s0 as required in the following statement:
ip link set dev enp4s0 mtu 1422
Last updated: 13 December 2023