Configuring the UIS VPN on Android using the strongSwan client
The strongSwan VPN client, available from the Google Play Store, offers a safe and easy-to-configure VPN option for Android users. You may be able to configure other VPN clients to work, using our generic technical instructions, but we do not recommend the built-in Android VPN client.
Before you start, you will need to know:
- your Network Access Token username and password
– create your token on the UIS Network Access Tokens site and keep the window or tab open – perhaps in an adjacent screen on a separate device – in readiness for when you'll need to copy the username and password.
- If you have been advised to use a Managed VPN, rather than the general University VPN service, you will need the VPN server hostname. Available VPNs and their server hostnames are listed on the Managed VPN page.
To set up the VPN service using the strongSwan client:
- Install the strongSwan VPN Client application from the Google Play Store using the link.
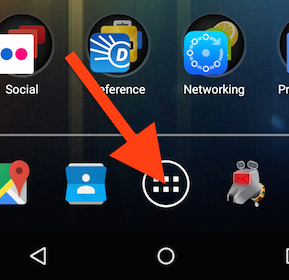
- From the home screen go to the Apps Menu:
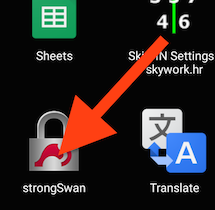
- Find the new strongSwan application and start it:
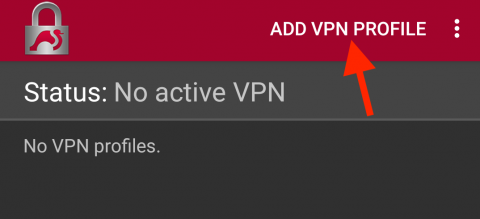
- You will be presented with the strongSwan status screen, listing the configured VPN profiles (which will initially be empty). Press the Add VPN Profile button at the top:
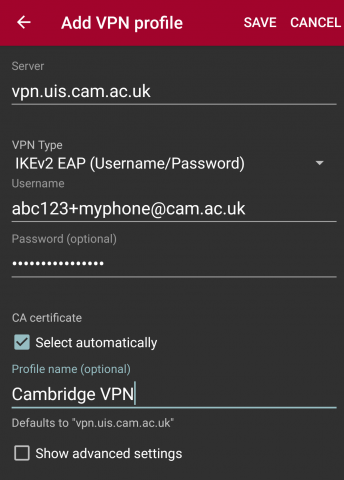
- You will be prompted to give details of the profile (connection). Enter the details as follows and then tap SAVE:
- Server: vpn.uis.cam.ac.uk or, if you are using a Managed VPN, use the VPN server hostname instead
- VPN type: IKEv2 EAP (Username/Password) (this should be the default option)
- Username: The username for the Network Access Token you created for this device, in the format CRSid+device@cam.ac.uk – for example, abc123+myphone@cam.ac.uk.
- Password (optional): The password for the Network Access Token you created for this device.
- CA certificate: Select automatically (the default)
- Profile name (optional): Cambridge VPN
- You will be returned to the strongSwan status screen and the new profile will be displayed. Tap on the profile (Cambridge VPN) to connect:

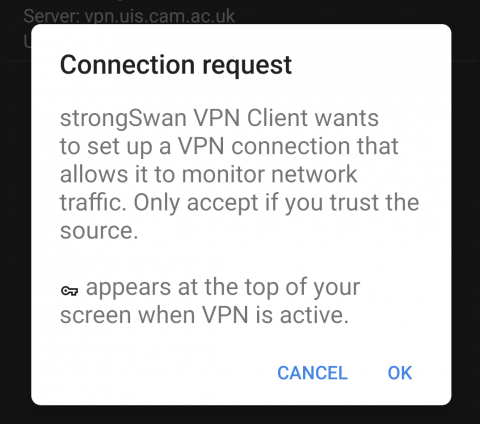
- You will receive a warning that the strongSwan VPN Client wishes to set up a VPN connection that allows it to monitor network traffic. This warning is normal and just Android advising you that your network connection will be redirected over the VPN. Tap OK to continue with the connection:
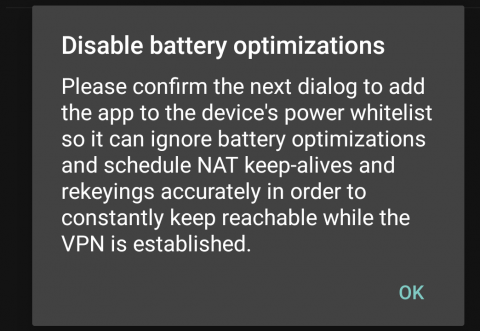
- You'll see a notification that you need to confirm the next dialogue to add swanSong to your device's power allowlist so that, when you're using a VPN connection, it can keep running in the background. Tap OK...
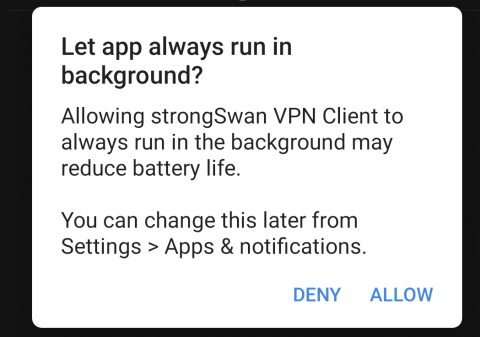
... and then tap ALLOW to confirm the app can run in the background:
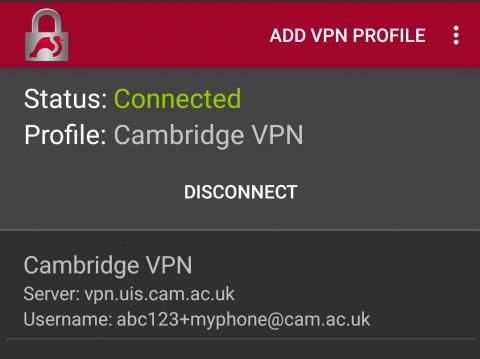
- The connection should now be established and this displayed on the status screen. A key symbol will also be displayed in the status bar at the top of the screen to remind you:
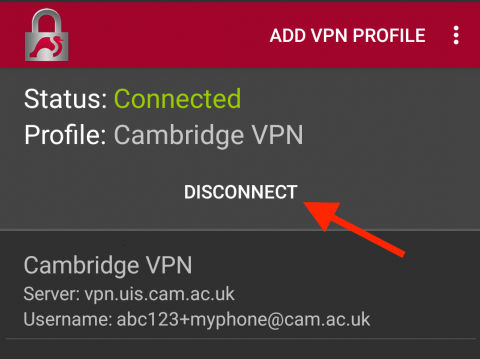
To disconnect
To disconnect, run the strongSwan application and select Disconnect in the status area:
To reconnect
Whenever you wish to reconnect to the VPN, start the strongSwan application and select the Cambridge VPN profile.