The initial Mailbox view shows a table of shared mailboxes for the selected institution, with the following details:
- institution code
- display name
- primary email address for the mailbox
- if the mailbox is hidden in the Global Address List
- if the mailbox has a password set for it
- a list of additional email addresses for the mailbox
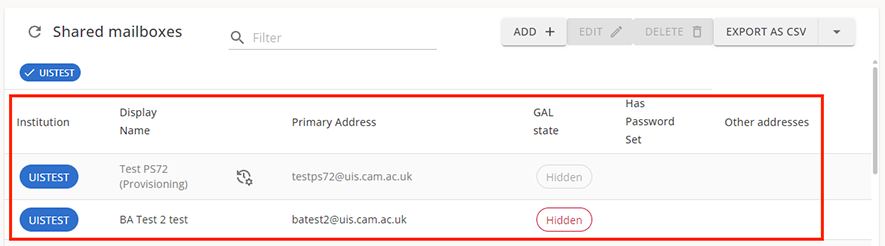
Select a column heading to sort data by that column.
To filter the list of mailboxes enter an email address or partial address and select enter. Only those that match will be displayed.
To remove the filter, delete the text in the filter box and select enter. The list will revert to all mailboxes.
At the top right of the page are buttons to create, delete, edit and export mailboxes. Select the drop down arrow next to “Export as CSV” to export the list as an Excel file.
Create a shared mailbox
To create a new shared mailbox:
- select a single institution using the chips in the top left of the screen. The ‘add’ button is disabled until only one institution is selected.
- select Add to open a drawer to the right to create a shared mailbox.
- enter a ‘Display name’ field, add a ‘Primary address’ email and select a domain from the dropdown list. The dropdown list will contain the domains available to the selected institution. The ‘Display name’ and ‘Primary address’ must be unique across Blue AD and Exchange Online.
- to add additional email addresses to the mailbox select ‘+’ to the right of the “Additional addresses” label and enter the email address you wish to add. Select “add” to add an address, and the cross to cancel.
- the mailbox will automatically appear in the Global Address List. Tick the box to hide it. You will not be able to add the mailbox to Outlook if it is hidden.
- sent mail from a shared mailbox will be stored in the sending user’s mailbox, not the shared mailbox. You can tick ‘Retain sent mail in mailbox’ to ensure that mail is kept within the shared mailbox.
- select “Create mailbox” to initiate the creation process.
The creation process involves various interactions with Microsoft’s cloud environment. Progress can be monitored by refreshing the mailbox list. Mailboxes being provisioned will be shown first in the list. Typically, a mailbox should be created within about 30 minutes after passing through nine processing steps, with steps 2, 5 & 8 taking the longest amount of time to complete.
Creating a mailbox will automatically create an associated access group named 'Access group for <primary email address>'. Members can be added to this group via the 'Edit' drawer once the shared mailbox has been created.
Edit mailbox
To edit a mailbox:
- select the mailbox you wish to edit.
- select edit to open an edit drawer similar to the 'Create new shared mailbox' dialogue.
- alter any aspect of the mailbox and select 'Apply changes' to make the change permanent.
- choose any of the additional addresses and 'Make primary' to swap it with the currently configured primary address.
If you change the primary email address of the mailbox, the associated access group will be renamed to keep the naming scheme consistent.
From this drawer you can also add members to the access group of the shared mailbox. Select the 'Access group members' tab under the 'Edit shared mailbox' heading. Follow the same procedure as for Group membership.
Delete selected mailbox
To delete a mailbox:
- select the mailbox you wish to delete
- select ‘Delete’ to open a confirmation dialogue
- choose ‘Delete’ to confirm or ‘Cancel’ to cancel the action. Selecting Delete will delete the mailbox and associated access group. There is no undo function.
Get help
If you need further support with Toolkit, raise a ticket in the IT self-service portal. Mark it for the attention of the collaboration tools team.