The UIS Managed Wiki service is now in maintenance mode and will be decommissioned on 01 August 2025. We are not accepting requests for new wikis.
Uploading a logo
From the toolbox section on the Main Page choose Special Pages then, from the Wiki.cam.ac.uk section at the top of that page, choose Logo Upload. Choose Browse.. to open a file browser. Once you have navigated to where you have the logo on your local disk select Open in the file browser then Upload.
Notes:. The maximum file size is 100 Kbytes. If you try to upload something larger than that you will get the error message Logo upload failed: Invalid logo file. Files that are in the right size range are converted on the server to create a logo in PNG format that fits within 135x135 pixels.
User access management
Many wiki managers will not need to do any manual user management in their wiki after it has been set up. Times when a wiki manager may need to perform some user management include:
- if read or edit access is trusted (i.e. limited to a defined list of users) and you are managing the list yourself within the wiki
- if read or edit access is trusted and, while you are using Lookup for members of an Institution, you also need a few people who are not members of that Institution to have access and are not able to created a Lookup group for these people
From the toolbox section on the Main Page choose Special Pages then, from the Wiki.cam.ac.uk section at the top of that page choose User Management.
The User Management Page
- At the top of the page is:-
- a summary of the access control levels set when the wiki was created (see the definitions in the page on applying for a managed wiki)
- a set of fields for manually adding a user.
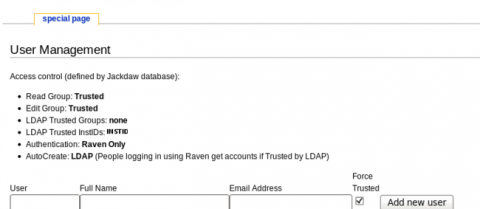
- At the bottom of the page is the list of current wiki users and a set of buttons for changing certain aspects of user access

Adding a user
To add a single user, enter their details into the boxes immediately under the access control summary. The User box must contain the CRSid (e.g. xyz123) of the person you are adding. If your wiki access control is the default level, 'Trusted', make sure that Force Trusted is selected (this is the default). Finally select the Add new user button.
Removing a user
Select the delete box by the names of the users you need to remove, then select Delete Marked Users.
Note: If you are using a Lookup group or Institution to provide all, or part of, your 'Trusted' set of users, and the user you wish to remove is a member of the relevant Lookup group or Institution, they will have access to the wiki until they are removed from that group or Institution in Lookup.
Making bulk updates
If you have several users to add you can choose to do this by using Bulk Updates. Note: Just uploading a list of users will replace the existing user list, not add to it!
To use Bulk update to add users:-
- Select Download and save the file of existing users to your computer
- Edit this file (or make a copy and edit that). There are two methods of adding users:
- Put all the details in the file that you will upload to your wiki. Each user must be on a separate line. The file format is comma-separated fields for each user. The fields are
Username,User Real Name,Email,Force Trusted
where Username is the user's CRSid (e.g. xyz123) and Force Trustedshould be true or false. For example
xyz123,A User,xyz123@cam.ac.uk,true abc987,Another User,abc987@cam.ac.uk,true - Add just the CRSid - one user per line. When the file is uploaded the system will check for the Real Name and Email details in Lookup. You will need to check, and where necessary change, the 'Force Trusted' setting via the User Management page after you have uploaded the file.
- Put all the details in the file that you will upload to your wiki. Each user must be on a separate line. The file format is comma-separated fields for each user. The fields are
- When you have finished preparing your file use the Browse... button to navigate to your file, select it, then use the Upload button to import it into your wiki.
Last updated: February 2011