Introduction
On timetable.cam.ac.uk, you can view and download your timetable and connect it to calendar applications such as Microsoft Outlook, Google Calendar, Apple Calendar, or a calendar app on your smartphone.
You can compile your own timetable by joining several timetables into one. You can also choose the corresponding group for each course.
This help page explains how timetable.cam.ac.uk works. If you have any questions, please refer to this help page first. If you're experiencing any (technical) issues or incorrect timetables, please email the Student Timetabling Team.
Logging in
You can log in to timetable.cam.ac.uk by clicking this link and navigating to the top right 'Sign in with Raven" login button. Once logged in, your preferences are saved, and you can connect your timetable to calendar applications. When using timetable.cam.ac.uk as a guest, your preferences won't be saved. So we advise you to log in by entering your university CRSid@cam.ac.uk email address and password.
Feature overview
The below screenshot shows an overview of the timetable.cam.ac.uk website:

Overview image of timetable.cam.ac.uk.
- Activities in your timetable.
- List of timetables that make up your personal timetable.
- Tabs to switch between various timetable views.
- Navigation arrows to browse to the next day, week or month.
- Button to add timetables to your personal timetable.
- Button to download or print your timetables.
- Button to connect your timetable to a calendar application or your smartphone or tablet.
- Calendar to choose a different date.
Consulting timetables
To view a timetable, a user first needs to select their area's of study from the dropdown. From this, you can create your own personal timetable from different the timetables listed, which will collectively display in the calendar.
In the displayed window, you can find timetables of your preference:
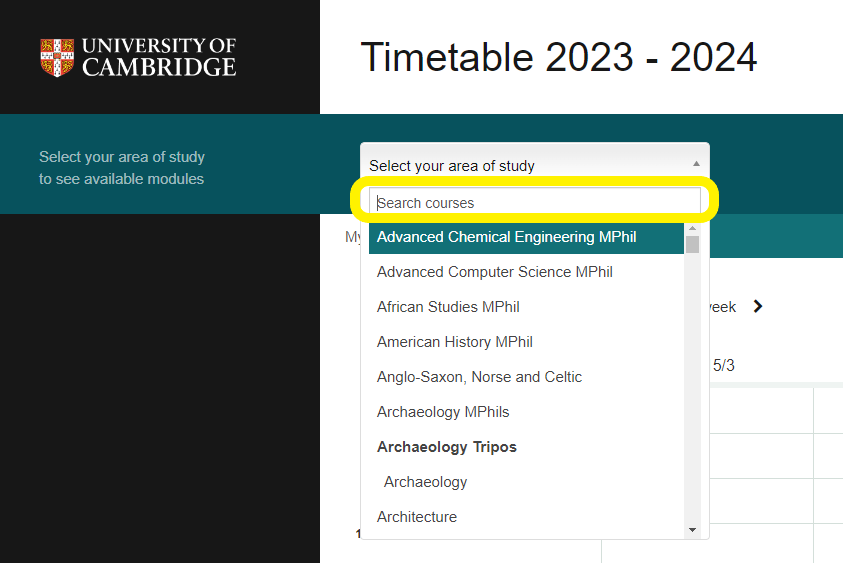
Finding timetables
You can start searching by selecting the above dropdown. After you have entered a query in the search field, a list of matched timetables appears. Please note that you usually need to enter a few letters before search results are displayed. You can find the minimum amount of letters above the search field for the query.
Based on the chosen course, you'll be presented with a further drop-down menu requesting for the selection of paper. Here you can select the programme of study.

When you have found the correct part or paper, a list of available modules will appear on the left of the screen.

Select the plus icon (+), next to the module to add it to the timetable. You can also add multiple timetables at once by checking several + symbols. To add more modules from other areas of study, follow the fore-mentioned steps to navigate to these areas and select the required modules following the previous method.